# Telosys documentation
**Welcome developer friend!**
In this documentation, you will find how to install and configure Telosys-CLI, how to use it with VS-Code or any other JetBrains IDE, how to create and customize your models and of course how to generate your code.
There is also a lot of more detailed information on creating or adapting template bundles to generate any type of code or text (programming languages, SQL, documentation, etc.)
In addition to this documentation you can also take a look at ...
* [GitHub](https://github.com/telosys-tools-bricks/telosys-cli)
* [Bluesky](https://bsky.app/profile/telosys.org)
* [X/Twitter ( @telosys )](https://x.com/telosys)
* [LinkedIn](https://www.linkedin.com/company/telosys/)
* [reddit ( r/telosys )](https://www.reddit.com/r/telosys/)
* [YouTube](https://www.youtube.com/channel/UCX5-ypQygEHMCGXVTTbhfNQ) ( short presentation : [Introducing Telosys 4.0](https://www.youtube.com/watch?v=nMEZ4tz-E4k) )
For your questions you can use …
* [StackOverflow](https://stackoverflow.com/) (use the “**telosys**” tag for your questions)
*
Telosys presentations and articles available on the web:
* [Telosys project booster (SlideShare)](https://fr.slideshare.net/lguerin/telosys-project-booster-paris-open-source-summit-2019)
* [Telosys: a lightweight and pragmatic code-generator](https://modeling-languages.com/telosys-tools-the-concept-of-lightweight-model-for-code-generation/)
* [Telosys: a Code Generation Tool](https://tomassetti.me/telosys-code-generation-tool/)
* [Telosys tutorial for Python/Bottle/SqlAlchemy (SlideShare)](https://fr.slideshare.net/lguerin/telosys-tutorial-code-generation-for-a-python-web-application-based-on-bottle-and-sqlalchemy)
And if you like Telosys please don’t forget to support the project. Maybe even become a sponsor.
# Telosys CLI
The **Telosys Command Line Interface** allows you to use all Telosys features with a simple and light Command Line Interface.
You can use Telosys CLI to
* initialize a new project
* configure your project
* create new models (from scratch or from database)
* install models from depots
* customize your entities in the models
* install bundles of templates from depots
* customize existing template or create your own templates
* generate your code
Telosys CLI has been developed with Java, \
the Java Runtime (JRE) is the only requirement to use it.
# Installation on Linux
## Prerequisite
**Java 8 (or +)** must be installed, that's all.
You can check it with the command `java -version`
## Installation
### 1) Download
With your browser go to "[**Download**](https://www.telosys.org/download/telosys-cli/index.html)" page
Choose the "Latest version" and ckick "Download" button.
A ZIP file "telosys-cli-x.x.x-xxx.zip" will be downloaded.
### 2) Unzip the file
Copy the “zip file” in the directory where you want to install Telosys.
Unzip the downloaded file : \
`unzip telosys-cli-x.x.x-xxx.zip`
Make the shell scripts "**`telosys`**" and "**`tt`**" executable \
`chmod 777 telosys` \
`chmod 777 tt`
### 3) Update 'PATH' environment variable
To be able to launch Telosys from any location, just add its directory to the "**PATH**". \
`export PATH=$PATH:/path/to/telosys-dir`
### 4) Run Telosys
Now if the PATH variable is set correctly you can launch Telosys from any directory.
Move to the directory where you want to use Telosys \
`cd myproject`
Launch Telosys-CLI with **`telosys`**command \
or with **`tt`** command for older versions (before version 4.2.0)
# Installation on Windows
## Prerequisite
**Java 8 (or +)** must be installed, that's all.
You can check it with the command \
`X:\>`**`java -version`**
## Installation
### 1) Download
With your browser go to "[**Download**](https://www.telosys.org/download/telosys-cli/index.html)" page
Choose the "**Latest version**" and ckick "**Download**" button.
A ZIP file "telosys-cli-x.x.x-xxx.zip" will be downloaded.
### 2) Unzip
Copy the "zip file" in the directory where you want to install Telosys.
Use your favorite zip tool to unzip "telosys-cli-x.x.x-xxx.zip" in this directory (eg "Extract Here" )
### 3) Update 'PATH' environment variable
To be able to launch Telosys from any location, just add its directory to the "**PATH**".
* Open the Start Search, type in “**variable**”, \
and choose “**Edit the system environment variables**”:
* In the "**System Properties**" window :
click the "**Advanced**" tab,
then click the "**Environment Variables**" button.
* In the "**Environment Variables**" window :
in the "**System variables**" section
select the "**Path**" variable and click the "**Edit**" button
* Add the **Telosys directory** in the **PATH** variable
### 4) Run Telosys
Now if the PATH variable is set correctly you can launch Telosys from any directory.
Open a command window ( open the Start Search and enter "**cmd**" )
Move to the directory where you want to use Telosys\
`X:\>`**`cd myproject`**
Launch Telosys-CLI using **`telosys`** command (`telosys.bat`)\
or **`tt`** command (`tt.bat`) for older versions (before version 4.2.0)\
`X:\myproject>`**`telosys`**
### 5) You can also create a shortcut on your desktop
For more convenience you can create a shortcut on the desktop
To launch Telosys in its own directory : \
`X:\telosys-dir\telosys.bat`
To launch Telosys in a specific directory (eg a project directory) use '**-h**' option : \
`X:\telosys-dir\telosys.bat -h X:\myproject-dir`
You can use the "telosys.ico" file as the shortcut icon.
# CLI configuration
The Telosys-CLI configuration is defined in the file **`telosys-cli.cfg`**.
This file is located in the directory where Telosys-CLI has been installed. It can be edited with any text editor.
For now, this file simply allows you to define a **specific external editor** that will be launched for all "edit" commands (eg "eb", "ecfg", etc.) and a **specific file explorer** for "fx" command.
## Text editor configuration
Telosys-CLI comes with its own text editor, but this editor is quite basic and requires a graphical interface (eg GNOME or KDE for Linux). So you might prefer to set another text editor.
Telosys allows you to define a command to launch your favorite text editor for example \
"Visual Source Code", "Atom", "Sublime Text", "Notepad++", etc
Use the **`EditorCommand`** property to define the command that will be launched by Telosys-CLI.
The value is the OS command to execute to launch the editor. If the executable file is accessible via the "PATH", you can use it as a simple command (without full path). Otherwise, you need to find where the editor is installed and use the full path.
The **`$FILE`** variable is a placeholder representing the file to edit.
### EditorCommand examples
**Visual Studio Code** ( executable file is "code" )
```
EditorCommand = code $FILE
EditorCommand = D:/Tools/Microsoft VS Code/code.exe $FILE
```
**Atom editor** ( executable file is "atom" )
```
EditorCommand = atom $FILE
EditorCommand = D:/Tools/atom/atom.exe $FILE
```
**Sublime Text** ( executable file is "subl" )
```
EditorCommand = subl $FILE
EditorCommand = D:/Tools/SublimeText/subl.exe $FILE
```
**Notepad++** ( executable file is "notepad++" )
```
EditorCommand = notepad++ $FILE
EditorCommand = C:/Program Files (x86)/Notepad++/notepad++.exe $FILE
```
**Linux Mint editors**
```
EditorCommand = /usr/bin/xed $FILE
EditorCommand = /usr/bin/gnome-terminal -e "vi $FILE"
EditorCommand = /usr/bin/gnome-terminal -e "nano $FILE"
```
**Linux Lubuntu editors**
```
EditorCommand = /usr/bin/leafpad $FILE &
EditorCommand = /usr/bin/lxterminal -e "vi $FILE"
EditorCommand = /usr/bin/lxterminal -e "nano $FILE"
```
## File explorer configuration
The "**fx**" command launches a file explorer in the current directory (since ver 4.1.0).
2 commands are defined by default : "explorer" for Windows and "open" for MacOS.
You can set your own command to use your favorite explorer \
by using the **`FileExplorerCommand`** property
The variable **`$DIR`** is a placeholder for the directory where to start the explorer.
### FileExplorerCommand examples
**Windows - 'TotalCommander'**
```
FileExplorerCommand = C:/Program Files/totalcmd/totalcmd64.exe $DIR
```
**Linux Ubuntu - 'Nautilus'** ( executable file is "nautilus" )
```
FileExplorerCommand = nautilus $DIR
```
# CLI commands
Telosys-CLI uses a set of short commands (based on 2 or 3 characters) to identify the action to be launched.
Most commands start with a letter which designates the **action**
* **`"e"`** for "edit"
* **`"l"`** for "list"
* **`"d"`** for "delete"
* **`"n"`** for "new" ( "creation" )
* **`"c"`** for "check"
* **`"i"`** for "install"
and the second letter is used to specify **on what** the action is applied
* **`"m"`** for "model"
* **`"e"`** for "entity"
* **`"b"`** for "bundle of templates"
* **`"t"`** for "template" etc
Examples :
* **`"nm"`** for "**n**ew **m**odel"
* **`"dm"`** for "**d**elete **m**odel"
* **`"ib"`** for "**i**nstall **b**undle"
* **`"le"`** for "**l**ist **e**ntities"
* **`"eb"`** for "**e**dit **b**undle"
Just press **`"?"`** to see all the available commands
Example of commands available in Telosys 4.2.0:
```
telosys#> ?
General commands :
. ? Help : Print help (list of all available commands)
. cd Change Directory : Change the current directory
. ls List : List the content of a directory
. mkdir Make Directory : Create a new directory in the current location
. pwd Print Working Directory : Print the current working directory
. e Edit : Open an external editor
. fx File Explorer : Open a file explorer in the current directory
. err Error : Print details about the last error
. env Environment : Environment state
. proxy Proxy configuration : Get current proxy configuration
. ver Versions : Versions information
. q Quit : Quit Telosys command line interface
. exit Exit : Exit Telosys command line interface
Project commands :
. h Home : Print or set the 'HOME' directory
. init Initialization : Init the Telosys directory with all required files
. cfg Configuration : Print project configuration (folders, variables, etc.)
. ecfg Edit Configuration : Open an editor to edit 'telosys-tools.cfg'
Database commands :
. ldb List Databases : List the databases configurations
. edb Edit Databases : Open an editor to edit 'databases.yaml' file
. cdb Check Database : Check database configuration : try to connect and get metadata
Model commands :
. m Model : Set/print the current model
. lm List Models : List the project models
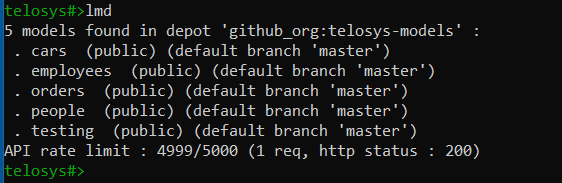
. lmd List Models in Depot : List models available in the depot
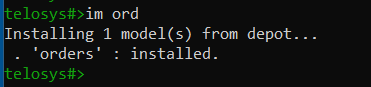
. im Install Model(s) : Install model(s) from the depot
. nm New Model : Create a new Telosys model (optionally from a database)
. em Edit Model : Edit the current/given model
. cm Check Model : Check the current/given model
. dm Delete Model : Delete the current/given model
Entity commands :
. le List Entities : List the entities defined in the current model
. ee Edit Entity : Edit an entity file
. ne New Entity : Create a new entity in the current model
. de Delete Entity : Delete the given entity in the current model
Bundle of templates commands :
. b Bundle : Print or set the current bundle
. lb List Bundles : List the project bundles
. lbd List Bundles in Depot : List bundles of templates available in the depot
. ib Install Bundle(s) : Install bundle(s) of templates available in the depot
. eb Edit Bundle : Edit the 'templates.cfg' file of the given bundle
. db Delete Bundle : Delete the current/given bundle
Template commands :
. lt List Templates : List the templates for the current bundle
. et Edit Template : Edit a template (.vm) file
Generation commands :
. gen Generate : Generate the given targets for the given entities
. genb Generation in batch mode : Launch generation for many models and many bundles
GitHub commands :
. ght GitHub Token : Set or remove the current GitHub personal access token (PAT)
. cgh Check GitHub : Check GitHub accessibility and get API rate limit
```
For more information about a specific command, just press **`"? command-name"`**
For example **`"? nm"`**
```
telosys#>? nm
nm : New Model
Description :
Create a new Telosys model (optionally from a database)
Usage :
nm model-name [database-id]
```
# Getting started
To start using Telosys, simply follow these 4 steps:
1. [Initialize a project ](#id-1-initialize-a-project)
2. [Set up a model](#id-2-set-up-a-model)
3. [Set up a bundle of templates](#id-3-set-up-a-bundle-of-templates)
4. [Generate your code](#id-4-generate-your-code)
## 1 - Initialize a project
When Telosys-CLI starts nothing is defined ( no "home directory", no "model", no "bundle", etc...)
You can use the **`env`** command to see the current Telosys environment.
```
telosys>env
```
With the command **`h`** you can see that the "home directory" is not yet defined.
### 1.1 - Set the "home directory"
When Telosys-CLI starts its current directory is the directory where it has been launched
Use **`pwd`** to print the current working directory
Use **`cd`** to change the current directory
Once your are in the correct directory (the directory where you want to work with Telosys) you can use the **`h`** command to set the project's home
Example 1 : use the current directory "**.**" as HOME
```
telosys>h .
```
Example 2 : use the "**foo**" subdirectory as HOME
```
telosys>h foo
```
Once Telosys HOME is defined the prompt contains a "#"
```
telosys#>
```
### 1.2 - Initialize the Telosys project folders and files
Once the "home directory" is defined, you can initialize the Telosys projet.
For that just run the **`init`** command
```
telosys#>init
```
This command creates the "**TelosysTools**" folder containing all the Telosys files and subfolders.
### 1.3 - Configure the project
Each project can be configured, for example, to define project-specific variables or to define the directory where the generated files must be created.
All the configuration of a Telosys project is defined in the "**TelosysTools/telosys-tools.cfg**" file. You can edit the "telosys-tools.cfg" file with your favorite text editor.
To print the current configuration, use the **`cfg`** command.
To edit the configuration file with the Telosys-CLI default editor use **`ecfg`** command.
For more information about project configuration see [Configuration & variables](/project-configuration).
If you want to try Telosys quickly you can continue with the default configuration.
## 2 - Set up a model
To generate application code, you need a **model** containing the **entities** of your business domain.
There are 3 ways to set up a Telosys model :
* **create a new model from scratch** \
an empty model in which you can then create the entities you need
* **create a new model from an existing relational database** : \
a model created from the database schema (1 entity for each table)
* **install an existing model from a depot** \
download and install a Git repository containing the model
For more information, see pages "[Model creation](/models/model-creation)" and "[Model installation](/models/model-installation)"
To manage your model and its entities you can use "**Model commands**" and "**Entity commands**".\
See "[Model management](/models/models-management)".
## 3 - Set up a bundle of templates
Once you have a model you need at least one **bundle of templates** to generate your code.
The templates are organized in "bundles". A **"bundle"** is a set of templates designed to generate a particular kind of targets.
Of course you can create your own templates from scatch, but the simplest way to start is to use existing templates. To do so, see "[Bundles installation](/bundles/bundles-installation)"
To manage your bundles of templates you can "**Bundle commands**" and "**Template commands**".\
See "[Bundles management](/bundles/bundles-management)".
## 4 - Generate your code
Once you have a **valid model** and a least one **bundle of templates**, you are **ready to generate your code**.
To generate your code you can use the following commands:
* **`gen`** to generate code with the current model and the current bundle
* **`genb`** to generate code in "batch mode" (since ver 4.1.0) with multiple models and/or bundles
See "[Code generation](/code-generation)".
# Telosys with VSCode
VSCode is the recommended editor for working with Telosys-CLI version 4+.
"**Telosys-VSCode**" is the latest **VSCode extension for Telosys**.
It is available on VSCode marketplace: \
This extension is open source and free.
# Extension installation
You can install the Telosys extension just like any other extension.
In VSCode click the "Extension" icon in the Activity Bar on the side of VS Code
In the search field
search "telosys"
select "**Telosys-VSCode**" extension
{% hint style="info" %}
NB \
There are 2 Telosys extensions \
"**Telosys-VSCode**" is the **latest** designed to work with **Telosys 4+** \
\=> Be sure to select this extension
{% endhint %}
# VSCode settings
For greater ease of use, we suggest the following configuration
### In VSCode Settings
To access "Settings" from the menu: **File** -> **Preferences** -> **Settings** or \[**Ctrl**] + \[ **,** ]
In section "**Text Editor**" / "**Suggestions**" :
* "**Snippet Suggestions**"\
Choose "**top**" to show snippet suggestions on top of other suggestions
* "**Word Based Suggestions**" \
Turn it "**off"** to obtain suggestions only from snippets (including those from Telosys extension).
It's usually enough to get a clearest view of snippets suggestion.
If you want to go further, have a look at the following options:
* Editor › **Suggest: Show Words**
* Editor › **Suggest: Filter Graceful**
* Editor: **Quick Suggestions**
# Telosys terminal in VSCode
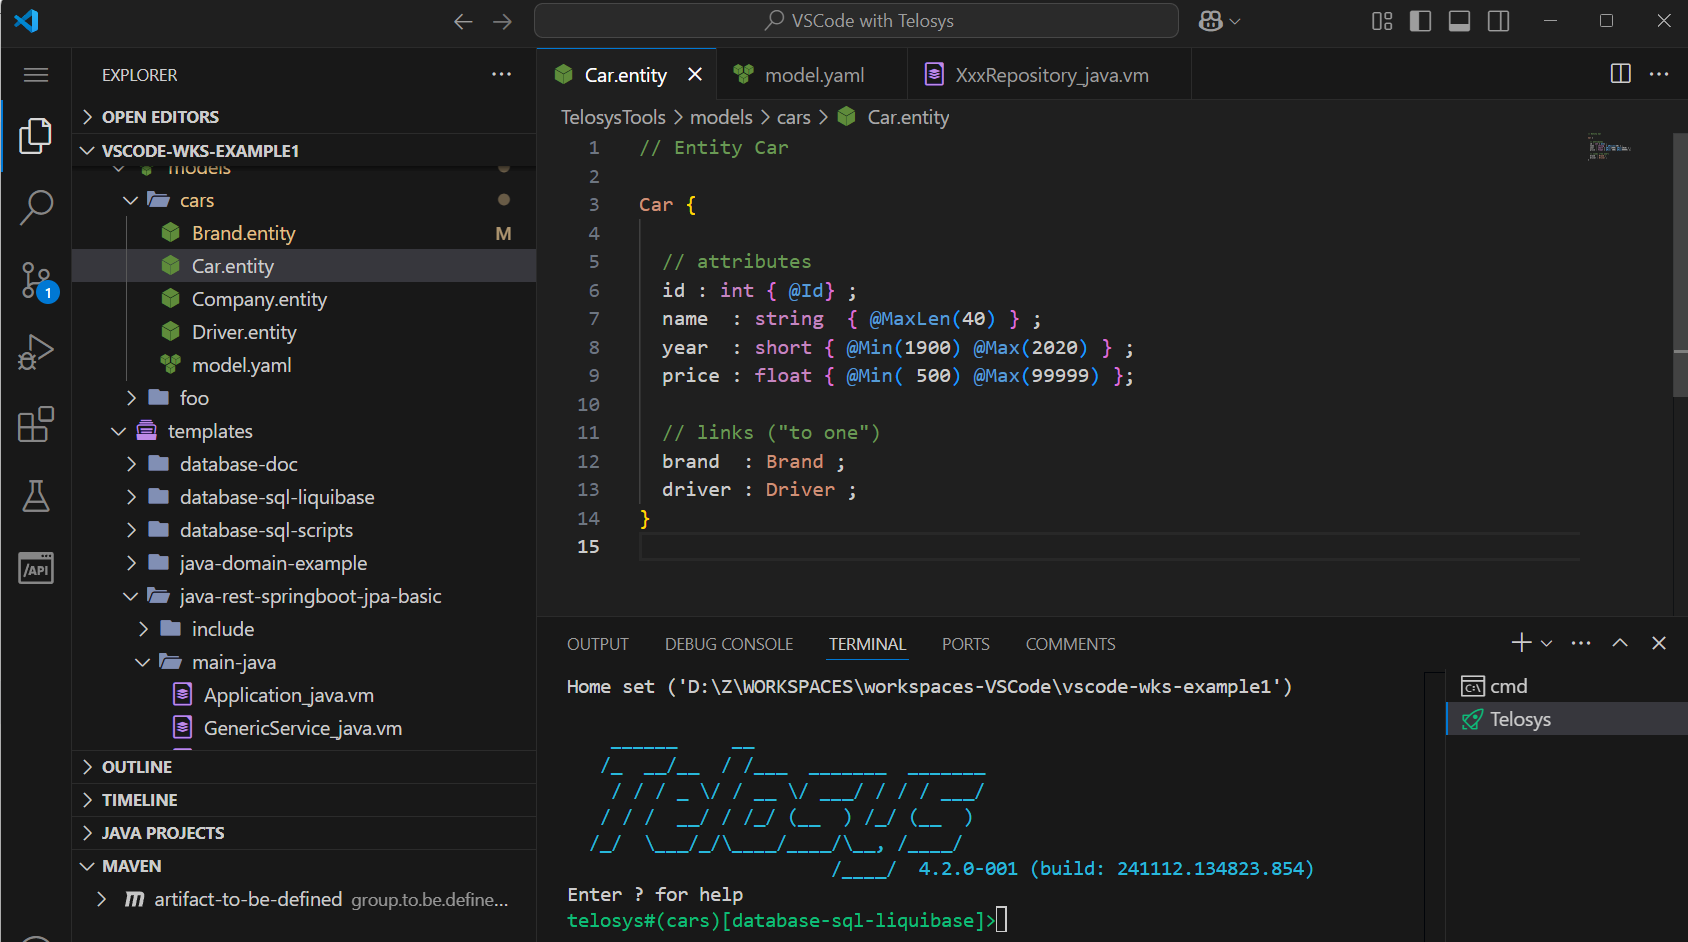
Visual Studio Code includes a full featured integrated terminal that starts at the root of your workspace ( see ).
This terminal is the ideal place to launch and use Telosys-CLI. So you can run all Telosys-CLI commands while staying in VSCode.
## Standard terminal usage
The most basic way to use Telosys in VSCode is to launch a standard terminal (predefined in VSCode) to get a shell and to launch Telosys from the command line.
But you will have to launch Telosys manually and to set the home directory each time you want to use it.
What's more, the terminal's name is "java", which is not self-explanatory.
To benefit from a dedicated Telosys terminal, simply create a "terminal profile", as described below\...
## Specific terminal profile
VSCode allows to define specific terminal profiles ( see )
Here's how to define a terminal profile for Telosys by editing the "settings.json" file.
### Open the "settings.json" file
Launch the "command palette" with \[ Ctrl ] + \[ Shift ] + \[ P ]
Search "open settings json"
Choose the JSON file to edit:\
"**User Settings**" JSON file (recommanded to be able to use the terminal in any workspace)\
or\
"**Workspace Settings**" JSON file (to store the file in the current workspace)
### Edit the "settings.json" file
In section "**terminal.integrated.profiles.windows**" add an entry for "**Telosys**" with
* "**path**" -> the command to launch = Java executable file
* "**args**" -> the command arguments:
* "-jar" + "full path to telosys-cli-X.X.X-nnn.jar" \
this is the ".jar" file to be executed by Java = telosys jar file\
do not forget to change it when you upgrade Telosys to a new version
* "-h" + "." \
to define the current directory as the Telosys "home"\
( for a VSCode terminal the current directory is the root of your workspace )
* "**overrideName**" = "**true**" -> to replace the dynamic terminal title
* "***icon***" -> optional (just to set a specific terminal icon )
* "***color***" -> optional ( just to set the icon color )
Example:
```json
"terminal.integrated.profiles.windows": {
"PowerShell": {
"source": "PowerShell",
"icon": "terminal-powershell"
},
"Command Prompt": {
"path": [
"${env:windir}\\Sysnative\\cmd.exe",
"${env:windir}\\System32\\cmd.exe"
],
"args": [],
"icon": "terminal-cmd"
},
"Git Bash": {
"source": "Git Bash"
},
"Telosys": {
"overrideName": true,
"path": [
"C:\\PATH\\TO\\JAVA\\bin\\java.exe"
],
"args": ["-jar", "C:\\PATH\\TO\\TELOSYS\\telosys-cli-4.0.0-001.jar", "-h", "."],
"icon": "terminal",
"color": "terminal.ansiGreen"
}
},
```
After this configuration "Telosys" appears as a new kind of terminal in VSCode
so you just have to launch it and it is ready to use in the current workspace
Telosys terminal with "**rocket**" icon :

# Telosys editor configuration
To use VSCode as the default editor for all Telosys editing commands, simply configure the 'editor command' in the Telosys-CLI configuration file.
To do so edit the file "**telosys-cli.cfg**" located in the directory where Telosys-CLI is installed and set the "**EditorCommand**" parameter to the "*VSCode command*" ("code.exe").
Example:
**`EditorCommand`**` ``=`` `**`C:/xxx/yyyy/Programs/Microsoft VS Code/Code.exe $FILE`**
Doing so, all editing commands "ee", "em", etc, will open the file to edit in a VSCode page.
# Telosys with JetBrains IDE
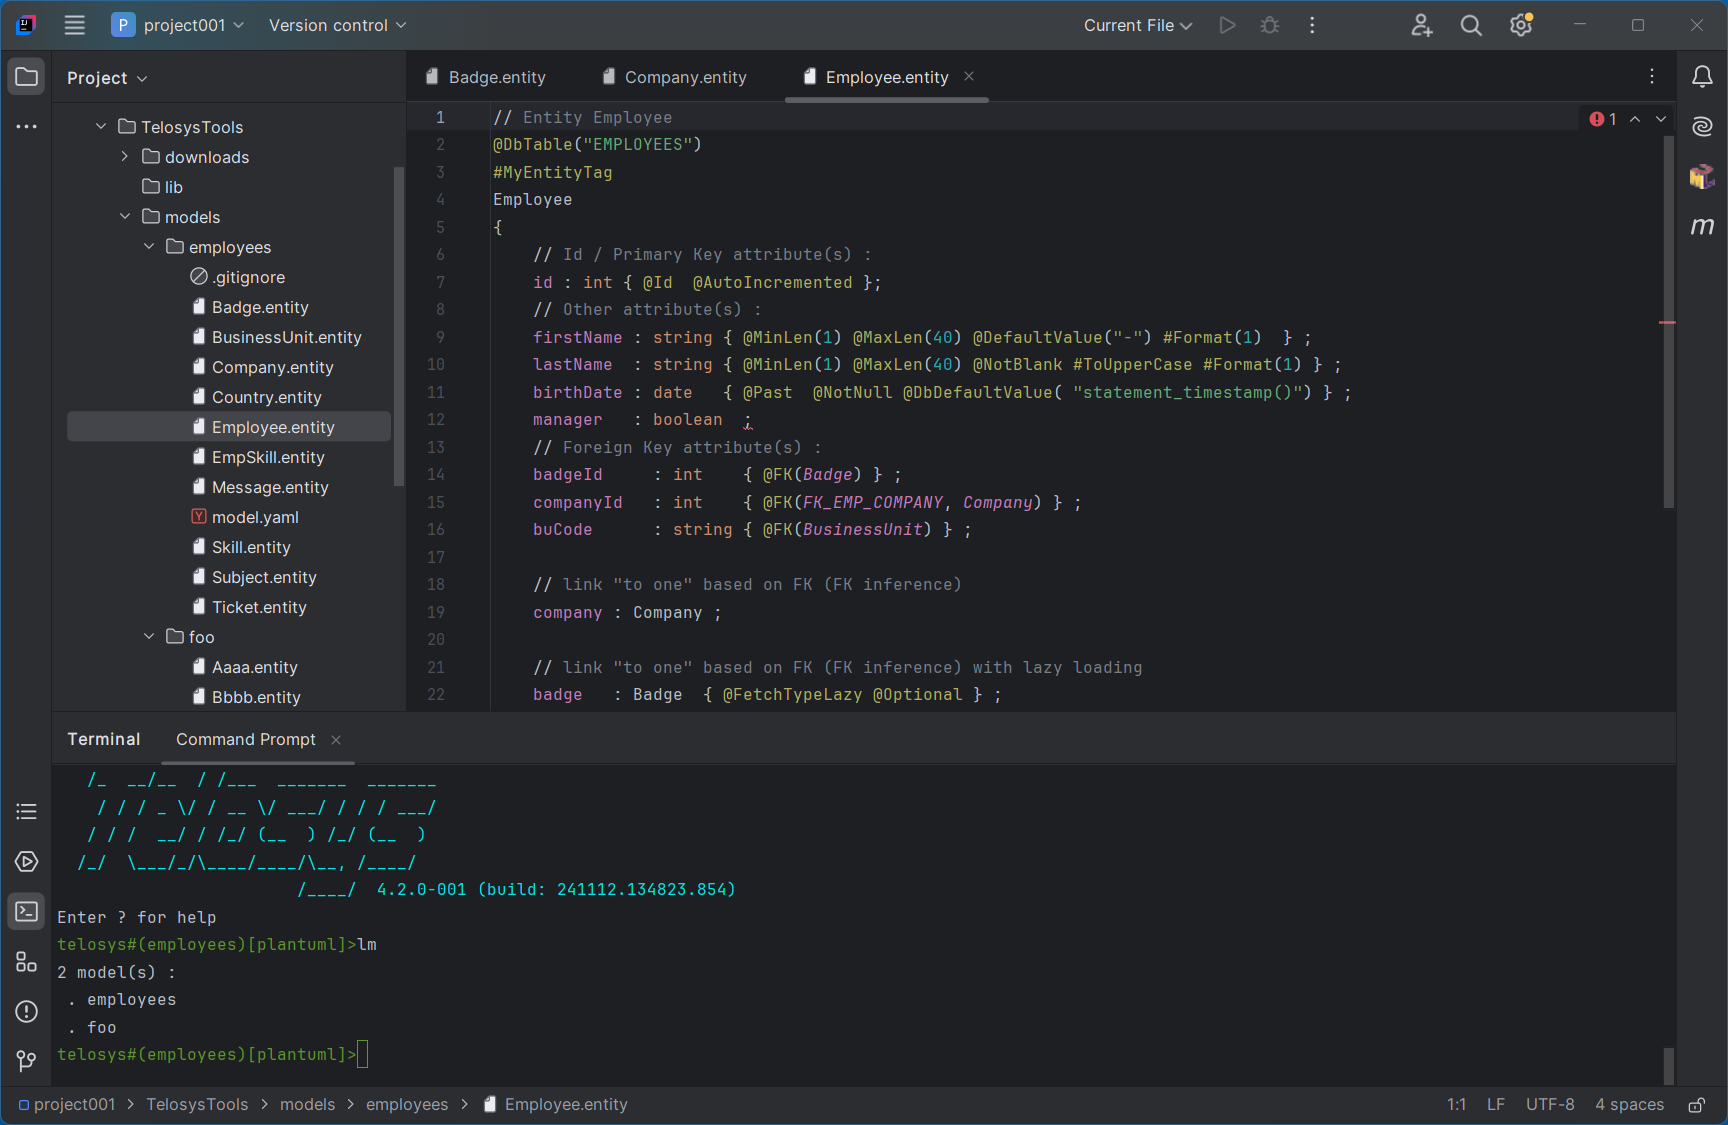
For seamless integration of **Telosys** with a **JetBrains IDE** (IntelliJ, PyCharm, GoLand, PhpStorm, etc.), the simplest approach is to launch the telosys command in the IDE's integrated **terminal** and install the **plugin** that provides syntax highlighting for .entity files.
### 1 – Launching Telosys in the Terminal
**Prerequisite**: \
The **`telosys`** command must be accessible via the **`PATH`** (an environment variable of the shell you are using; see "Telosys installation" for details).
**Steps**:
* Open a new tab in the IDE's terminal with the shell of your choice (by default, the current directory is the root of the active project).
* Launch Telosys from this shell: \
Command: **`telosys`** (or **`tt`** for older versions). \
Telosys starts in the current directory.
* Set the Telosys "home" directory with the command **`h .`**
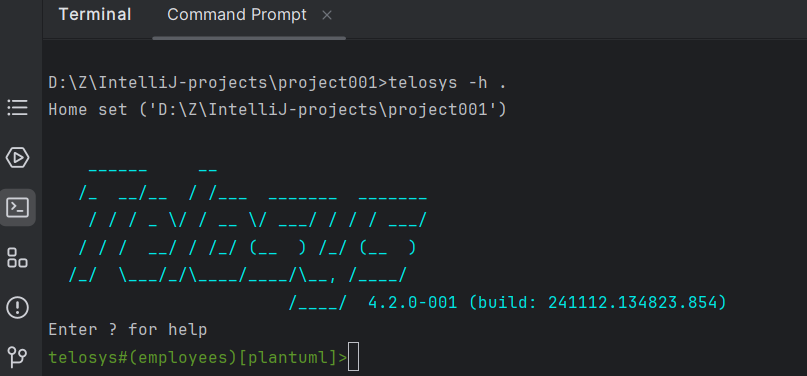
**Note**: \
You can also launch Telosys with the -h . parameter so that the "home" directory is set immediately.\
Command: **`telosys -h .`**
### 2 - Terminal customization
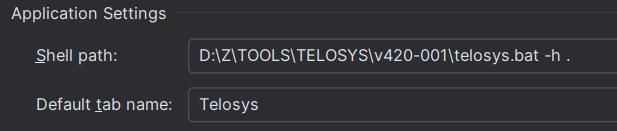
You can also use the IDE settings to define Telosys as the terminal shell.
**Steps**:
* Open the "**Settings**" (Ctrl + Alt + S)
* Go to "**Tools / Terminal**"
* Define Telosys as the default shell :
* Shell path: **`aaa/bbb/ccc/telosys.bat -h .`**\
(telosys command full path, with ".bat" extension on Windows)
* Default tab name: **`Telosys`**
Example:
By doing so, Telosys will be launched by default every time a new tab is opened in the terminal ( for example by clicking on “**`+`**” or with "**`Ctrl+Shift+T`**" )
### 3 - Plugin installation
See:
### 4 - Tips and tricks for IDE
#### Spelling
If you have the word "Telosys" in the generated code (in comments for examples) \
the IDE will consider it as a "typo". \
To avoid that you just have to add it in the IDE dictionary:
* In the menu: **Settings** / **Preferences** : search "*spelling*"
* Select the dictionary:
* Application-level = for all projects you open in this IDE
* Project-level = only the current project
* ⇒ Select **application-level**
* Add the new word \[+] in "**Accepted words**"
# Project configuration
The project configuration is defined in the file **TelosysTools/telosys-tools.cfg**
Each line has the following syntax :
```
name = value
```
Each line starting with a "#" is a comment :
```
# this is a comment
```
### **"SpecificTemplatesFolder" -> specific location for bundles of templates**
To define a specific location for templates, a directory where the templates are located for the current project. By default templates are located in "(project-home)/TelosysTools/templates", if you want to use another directory you can define it with this parameter.
Examples:
```
#-- Specific location for bundles of templates (Windows) :
SpecificTemplatesFolder=C:/dir1/dir2
#-- Specific location for bundles of templates (Linux) :
SpecificTemplatesFolder=/dir1/dir2
```
### **"**SpecificModelsFolder**" -> specific location for models**
(since ver 4.2.0)
To define a specific location for models, a directory where the models are located for the current project. By default models are located in "(project-home)/TelosysTools/models", if you want to use another directory you can define it with this parameter.
Examples:
#-- Specific models location (Windows) :
SpecificModelsFolder=C:/dir1/dir2

#-- Specific models location (Linux) :
SpecificModelsFolder=/dir1/dir2
### **"SpecificDestinationFolder"** -> specific destination for generation output files
To define a specific destination for code generation. The root directory where the generated files will be placed. By default the generated files are located in the current project directory (project home), you can change it with this parameter.
Examples:
```
#-- Specific destination for code generation (Windows) :
SpecificDestinationFolder=C:/dir1/dir2
#-- Specific destination for code generation (Linux) :
SpecificDestinationFolder=/dir1/dir2
```
### **"**SpecificDepotForBundles**" -> specific "depot" for bundles**
(since ver 4.2.0)
The standard "depot" for available "bundles of templates" is a Telosys organization in GitHub.\
You can define your own "depot" to store and install your bundles.
For GitHub 3 types of definitions are possible:
* **`github_org`** -> GitHub organization + " **:** " + ***organization-name***
* **`github_user`** -> GitHub user + " **:** " + ***user-name***
* **`github_current_user`** -> GitHub current user ( user authenticated by the current token )
Examples:
#-- Organization in GitHub :
SpecificDepotForBundles=github_org:my-organization
#-- User in GitHub :
SpecificDepotForBundles=github_user:my-user
#-- Current authenticated user in GitHub :
SpecificDepotForBundles=github_current_user
### **"**SpecificDepotForModels**" -> specific "depot" for models**
(since ver 4.2.0)
Same principle as for the bundles
Examples:
```
SpecificDepotForModels=github_org:my-organization
SpecificDepotForModels=github_user:my-user
SpecificDepotForModels=github_current_user
```
### Http proxy configuration
Telosys uses http to get models from a remote repository (usually GitHub).
So if you use a proxy to access the Internet you need to configure its configuration so that the Telosys "http client" can connect to proxy.
The usual proxy configuration settings are expected (for http and https) :
* **http\[s].proxyHost** : \
the host name of the proxy server
* **http\[s].proxyPort** : \
the port number of the proxy server
* **http\[s].nonProxyHosts** : \
a list of hosts that should be reached directly, bypassing the proxy
* **http\[s].proxyUser** : \
the proxy user name
* **http\[s].proxyPassword** : \
the proxy user password
Example:
```
# --- Network proxy configuration
http.proxyHost=my.proxy.hostname
http.proxyPort=3128
http.nonProxyHosts=localhost|127.0.0.1
http.proxyUser=foo
http.proxyPassword=secret
#--
https.proxyHost=my.proxy.hostname
https.proxyPort=3129
https.nonProxyHosts=localhost|127.0.0.1
https.proxyUser=foo
https.proxyPassword=secret
```
# Project variables
Each Telosys project has a set of variables available at "**project level**".
This is the highest level of variable definition. These variables are usable everywhere in the current project : in templates files (".vm") and in bundle configuration file ("templates.cfg").
Project variables are defined in the file "**TelosysTools/telosys-tools.cfg**".
Each line has the following syntax :
VARIABLE_NAME = value
Each line starting with "#" is a comment :
```
# this is a comment
```
By convention, the variables defined at project level are always in upper case.
### Standard variables
A "standard variable" is a variable that is supposed to always be defined (for all types of projects).
Examples :
```
# -------------------------------------------
# STANDARD VARIABLES
# -------------------------------------------
# --- Folders
SRC = src/main/java
RES = src/main/resources
WEB = src/main/webapp
TEST_SRC = src/test/java
TEST_RES = src/test/resources
DOC = doc
TMP = tmp
# --- Packages
ROOT_PKG = org.foo.bar
```
### Specific variables
A "project-specific variable" is a variable defined for the specific needs of a project.
For example, a project variable can be defined in a project to generate PHP code and not defined in another project which aims to generate Python code.
Note : a specific variable cannot override a standard variable.
Examples :
```
# -------------------------------------------
# SPECIFIC VARIABLES
# -------------------------------------------
# Project configuration :
ProjectVariable.PROJECT_NAME = cool-project
ProjectVariable.MAIN_ENTITY = Employee
ProjectVariable.PROJECT_VERSION = 1.0.0-SNAPSHOT
ProjectVariable.MAVEN_GROUP_ID = com.foo.bar
# Modules directories :
ProjectVariable.MICROSERVICE_DIR = employee-ms
ProjectVariable.APPLICATION_DIR = application
ProjectVariable.COMMONS_DIR = commons
```
# Project databases
A Telosys project can define one or more **databases**.
Each database can be used to create a **new model** based on its database schema (tables, relations, etc).
Telosys uses JDBC, so it is able to connect to **any database** that provides a **JDBC driver**.
Project databases are defined in the file "**TelosysTools/databases.yaml**".
This YAML file can be edited with any editor or IDE.
### Commands for databases definition
* **`ldb`** -> List databases defined in the current project
* **`edb`** -> Edit "databases.yaml" file with the editor defined in Telosys-CLI configuration
* **`cdb`** -> Check database configuration (try to connect and to get meta-data)
### YAML file structure
The file contains a list of database configurations (n items in "**`databases:`**" entry)
For each database entry:
* Database identification:
* **`id:`** (string) a unique identifier for the database
* **`name:`** (string) a name describing the database
* **`type:`** (string) the database type \
examples: "PostgreSQL", "MySQL", "Oracle", etc
* JDBC connection:
* **`driver:`** (string) the JDBC driver to use to connect to the database (driver Java class name) \
examples: "org.postgresql.Driver", "org.mariadb.jdbc.Driver"
* **`url:`** (string) the JDBC URL for connection \
examples: "jdbc:postgresql://{HOST}:{PORT}/{DATABASE}"
* **`user:`** (string) the database user name
* **`password:`** (string) the database user password
* What tables to retrieve - first level filter:
* **`catalog:`** (string) the database catalog to use or '!' for none
* **`schema:`** (string) the database schema to use or '!' for none
* **`tableNamePattern:`** (string) pattern used as table name filter \
examples: "%", "ABC%", ...
* **`tableTypes:`** (string) types to retrieve, separated by blanks \
examples: "TABLE" (only tables), "VIEW" (only views), "TABLE VIEW" (tables and views)
* What tables to retrieve - second level filter (applied on the result of the first level filter)
* **`tableNameExclude:`** (string) regular expression used to exclude tables
* **`tableNameInclude:`** (string) regular expression used to include tables
* Options for Telosys model creation ("boolean" type for all):
* **`linksManyToOne:`** (default = true) create "**ManyToOne**" **links** in model entities
* **`linksOneToMany:`** (default = false) create "**OneToMany**" **links** in model entities
* **`linksManyToMany:`** ( default = false) create "**ManyToMany**" **links** in model entities
* **`dbComment:`** (default = true) create **@DbComment(...)** annotation (entity & attribute level)
* **`dbCatalog:`** (default = true) create **@DbCatalog(...)** annotation (entity level)
* **`dbSchema:`** (default = true) create **@DbSchema(...)** annotation (entity level)
* **`dbTable:`** (default = true) create **@DbTable(...)** annotation (entity level)
* **`dbView:`** (default = true) create **@DbView(...)** annotation (entity level)
* **`dbName:`** (default = true) create **@DbName(...)** annotation (attribute level)
* **`dbType:`** (default = true) create **@DbType(...)** annotation (attribute level)
* **`dbDefaultValue:`** (default = true) create **@DbDefaultValue(...)** annotation (attribute level)
### Setting up the JDBC driver library
After defining the database in "databases.yaml" you also need to set up the **Java library** containing the **JDBC driver**.
The Java library is the "**.jar**" file (sometimes ".zip") provided by the database supplier.
JDBC library files examples:\
\- `postgresql-42.2.26.jre7.jar` \
\- `mariadb-java-client-3.1.0.jar`
Put the "**.jar**" file in "**TelosysTools/lib**" directory so that Telosys can use it.
### Check database configuration
Once a database has been defined in "databases.yaml", it is recommended to test the database configuration using the "**cdb**" command.
* Check if it is possible to connect to the database\
**`cdb `**
* Check **tables** retrieved -> **`-t`**\
**`cdb `****`-t`**
* Check **columns** retrieved -> **`-c`**\
**`cdb `****`-c`**
* Check **primary keys** retrieved -> **`-pk`**\
**`cdb `****`-pk`**
* Check **foreign keys** retrieved -> **`-fk`**\
**`cdb `****`-fk`**
* Get database **shemas** -> **`-s`**\
**`cdb `****`-s`**
* Get database **catalogs** -> **`-cat`**\
**`cdb `****`-cat`**
* Get database **information** -> **`-i`**\
**`cdb `****`-i`**
When all checks are OK, you are ready to create a model from the database.
### Create a new model from a database
To create a new model from one of the databases defined in "databases.yaml" you just have to use the "nm" (New Model) command.
See "[Model creation](/models/model-creation)"
# PostgreSQL database
## Telosys database configuration
Below are examples of typical configurations for a **PostgreSQL** database.
### Since Telosys 4.3
```yaml
- id: pgcars
name: PostgreSQL 'cars' schema on 'localhost'
type: POSTGRESQL
# JDBC configuration
url: jdbc:postgresql://myhost:5432/mydatabase
user: john_doe
password: not_to_reveal
# Metadata parameters
schema: cars
```
### Before Telosys 4.3
```yaml
- id: pgcars
name: PostgreSQL 'cars' schema on 'localhost'
type: POSTGRESQL
# JDBC configuration
driver: org.postgresql.Driver
url: jdbc:postgresql://myhost:5432/mydatabase
user: john_doe
password: not_to_reveal
# Metadata parameters
catalog: '!'
schema: cars
tableNamePattern: '%'
tableTypes: TABLE
```
### JDBC driver
* Download:
* Web site:
* MVN Repository: \
"PostgreSQL JDBC Driver"
* JAR file example : `postgresql-42.7.7.jar`
* Driver class name : **org.postgresql.Driver**
## Technical information about PostgreSQL
### Structure
Server (cluster) → **Database** → **Schema** → Tables/Objects
* **Database**: A physical database (separate catalog). Connections are always made to a specific database. Databases are isolated — you can’t query across them without special tools (like `dblink` or FDWs).
* **Schema**: A logical namespace *inside a database*. A database can have multiple schemas (e.g., `public`, `sales`, `hr`). Objects (tables, views, etc.) live inside schemas. You can query across schemas in the same database (`sales.orders`, `hr.employees`).
### PostgreSQL case conversion rules
* **Unquoted identifiers**
* Always **converted to LOWERCASE**
* Applies to both **table names** and **column names**.
* **Quoted identifiers**
* Case is **preserved exactly as written**
* They are **case-sensitive** in SQL requests
### Schema management
```textile
-- Create schema
CREATE SCHEMA [IF NOT EXISTS] foo;
-- Get current schema
SELECT CURRENT_SCHEMA();
-- Set current schema
SET SEARCH_PATH = foo ;
```
# MySQL database
## Telosys database configuration
Below are examples of typical configurations for a **MySQL** database.
### Since Telosys 4.3
  - id: mysqldb
    name: MySQL 'employees' database
    type: MYSQL
    # URL jdbc:mysql://<host>:<port>/<database>?<options>
    url: jdbc:mysql://myhost:3306/employeesdb
    user: john_doe
    password: not_to_reveal
### Before Telosys 4.3
```yaml
- id: mysqldb
name: MySQL 'employees' database
type: MYSQL
# JDBC driver
driver: com.mysql.cj.jdbc.Driver
# URL jdbc:mysql://:/?
url: jdbc:mysql://myhost:3306/employeesdb
user: john_doe
password: not_to_reveal
# Metadata parameters
tableNamePattern: '%'
tableTypes: TABLE
```
### JDBC driver
* Download:
* Web site: \
"MySQL Connector/J"
* MVN Repository: \
"MySQL Connector/J"
* JAR file example: `mysql-connector-j-9.5.0.jar`
* Driver class name: **com.mysql.cj.jdbc.Driver** (since Connector/J 8.0)\
(old versions used **com.mysql.jdbc.Driver**)
## Technical information about MySQL
### Structure
Server → **Database** (= **Schema**) → Tables/Objects
* **Database**: The main organizational unit. In practice, a "**database**" in MySQL is what most people think of as a "**schema**". When you run `CREATE DATABASE`, it’s like creating a schema.
* **Schema**: Synonymous with database. \
MySQL treats `CREATE DATABASE foo;` and `CREATE SCHEMA foo;` as the same operation.
* **Cross-database** queries (cross-schema) are allowed within the same server instance (`db1.table1 JOIN db2.table2`)
### Case conversion rules
* **column name**: \
in MySQL, column names are **not case-sensitive**, \
whether the identifiers are in quotes or not.
* **table name** (file system rules matter):\
\- on **Linux**: may be case-sensitive only if `lower_case_table_names=0`\
\- on **Windows**/**macOS**: case-insensitive.
# MariaDB database
## Telosys database configuration
Below are examples of typical configurations for a **MariaDB** database.
### Since Telosys 4.3
```yaml
- id: mariadb
name: MariaDB 'cars' database
type: MARIADB
# URL jdbc:mariadb://:/?
url: jdbc:mariadb://myhost:3305/carsdb
user: john_doe
password: not_to_reveal
```
### Before Telosys 4.3
```yaml
- id: mariadb
name: MariaDB 'cars' database
type: MARIADB
# JDBC driver
driver: org.mariadb.jdbc.Driver
# URL jdbc:mariadb://:/?
url: jdbc:mariadb://myhost:3305/carsdb
user: john_doe
password: not_to_reveal
# Metadata parameters
tableNamePattern: '%'
tableTypes: TABLE
```
### JDBC driver
* Download:
* Web site: \
"Java 8+ Connector"
* MVN Repository: \
"MariaDB Java Client"
* JAR file example: `mariadb-java-client-3.5.6.jar`
* Driver class name: **org.mariadb.jdbc.Driver**
## Technical information about MariaDB
### Structure
Server → **Database** (= **Schema**) → Tables/Objects
* **Database**: The main organizational unit. \
In practice, a "**database**" is what most people think of as a "**schema**". \
When you run `CREATE DATABASE`, it’s like creating a schema.
* **Schema**: Synonymous with database. \
`CREATE DATABASE foo;` and `CREATE SCHEMA foo;` are the same operation.
* **Cross-database** queries (cross-schema) are allowed within the same server instance (`db1.table1 JOIN db2.table2`)
### Case conversion rules
* **column name**: \
in MariaDB, column names are **not case-sensitive**, \
whether the identifiers are in quotes or not.
* **table name** (file system rules matter):\
\- on **Linux**: may be case-sensitive only if `lower_case_table_names=0`\
\- on **Windows**/**macOS**: case-insensitive.
# SQLite database
## Telosys database configuration
Below are examples of typical configurations for a **SQLite** database.
### Since Telosys 4.3
```yaml
- id: sqlite
name: SQLite database
type: SQLITE
# JDBC config
url: jdbc:sqlite:D:\Z\DB-DATA\SQLite-data\sqlite-db-example.db
# no user
# no password
```
### Before Telosys 4.3
```yaml
- id: sqlite
name: SQLite database
type: SQLITE
# JDBC config
driver: org.sqlite.JDBC
url: jdbc:sqlite:D:\Z\DB-DATA\SQLite-data\sqlite-db-example.db
# no user
# no password
# Metadata parameters
tableNamePattern: '%'
tableTypes: TABLE
```
### JDBC driver
* Download:
* Web site:
* MVN Repository: \
"SQLite JDBC"
* JAR file example: `sqlite-jdbc-3.50.3.0.jar`
* Driver class name: **org.sqlite.JDBC**
## Technical information about SQLite
### Structure
**Database file(s)** (main/temp/attached) → Tables/Objects
* **Database**: SQLite is just a **single-file database**. When you connect, you are in one database. \
There’s no concept of multiple independent databases inside one connection.\
SQLite is an embedded database. There is no database server, no user accounts, and no network authentication.
* **Schema**: There is no concept of "schema" in SQLite, but it can be simulated by "attaching" databases.\
SQLite supports:
* **main** (the connected file)
* **temp** (temporary objects)
* any **attached databases** (via `ATTACH DATABASE 'file2.db' AS otherdb;`)
These act "*like schemas"* in terms of naming (`main.table1`, `otherdb.table2`), but they’re really separate database files.
### Boolean type
SQLite **does not have a native BOOLEAN type**.
It uses dynamic typing: a column can store any value regardless of declared type.\
Conventionally, booleans are stored as: **0 → false** and **1 → true**\
You can declare a column as BOOLEAN, INTEGER, or NUMERIC; \
SQLite just treats it as an affinity, not a strict type.
If you use **Hibernate** with **SQLite dialect**, a boolean or Boolean in your entity is usually mapped to INTEGER (or NUMERIC) in the DB.\
Hibernate automatically persists: true → 1 and false → 0\
Reading from the column is automatically converted back to boolean.\
So no converter is needed for standard 0/1 boolean storage.
### Notes
* **Authentication**: \
By default, SQLite databases are just files (.db or .sqlite) on disk.\
Anyone who can read/write the file has full access to the database.
* **No "catalog" and "schema"**\
There is no concept of schema and catalog in SQLite
\
When Telosys retrieves the database model, 'catalog' and 'schema' are always 'null'.
* **In-memory database**\
It's possible to work only "in-memory".\
The database exists only in RAM, not on disk.
\
To do so use JDBC URL like this: `"jdbc:sqlite::memory:"`\
NB: duration=connexion, as soon as the **connection** is closed, the entire database (all tables) disappears. SQLite supports a mode that allows multiple connections to share the same in-memory database: `"jdbc:sqlite:file:memdb1?mode=memory&cache=shared"`\
it will create an in-memory database named "memdb1" (this will not create any files on disk)\
But even with this mode a shared in-memory database only exists while **at least one connection to it is still open**. As soon as the last connection closes, SQLite frees the memory, and all tables vanish.
# SQL Server database
## Telosys database configuration
Below are examples of typical configurations for a **SQL Server** database.
### Since Telosys 4.3
```yaml
- id: sqlsrv
name: SQL Server database
type: SQLSERVER
# JDBC configuration
url: jdbc:sqlserver://localhost:1433;databaseName=MyDB
user: john_doe
password: not_to_reveal
# Metadata parameters
schema: cars
```
### Before Telosys 4.3
```yaml
- id: sqlsrv
name: SQL Server database
type: SQLSERVER
# JDBC configuration
driver: com.microsoft.sqlserver.jdbc.SQLServerDriver
url: jdbc:sqlserver://localhost:1433;databaseName=MyDB
user: john_doe
password: not_to_reveal
# Metadata parameters
catalog: '!'
schema: cars
tableNamePattern: '%'
tableTypes: TABLE
```
### Other JDBC URL examples
```
jdbc:sqlserver://localhost:1433;databaseName=TestDB;encrypt=true;trustServerCertificate=true;
```
### JDBC driver
* Download:
* Web site:
* MVN Repository:
* JAR file examples :
* mssql-jdbc-13.2.1.jre8.jar
* mssql-jdbc-13.2.1.jre11.jar
* Driver class name : **com.microsoft.sqlserver.jdbc.SQLServerDriver**
## Technical information about SQL Server
### Structure
Server (instance) → **Database** → **Schema** → Tables/Objects
* **Database**: A physical database (similar to PostgreSQL). You must connect to a specific database. Each database is isolated, though cross-database queries are possible (`db1.dbo.table1`).
* **Schema**: A namespace *within a database*. Default schema is usually `dbo`. Users can own schemas, and schemas provide organizational and security boundaries.
# Oracle database
## Telosys database configuration
Below are examples of typical configurations for **Oracle** database.
### Since Telosys 4.3
```yaml
- id: oracle
name: Oracle database
type: ORACLE
# JDBC connection
# url for SID: jdbc:oracle:thin:@[HOST][:PORT]:SID (older format)
# url for SERVICE: jdbc:oracle:thin:@[HOST][:PORT]/SERVICE (newer format)
url: jdbc:oracle:thin:@localhost:1521/MYDBSERVICE
user: SCOTT
password: TIGER
# Metadata parameters
schema: MYSCHEMA
```
### Before Telosys 4.3
```yaml
- id: oracle
name: Oracle database
type: ORACLE
# JDBC driver
driver: oracle.jdbc.OracleDriver
# JDBC connection
# url for SID: jdbc:oracle:thin:@[HOST][:PORT]:SID (older format)
# url for SERVICE: jdbc:oracle:thin:@[HOST][:PORT]/SERVICE (newer format)
url: jdbc:oracle:thin:@localhost:1521/MYDBSERVICE
user: SCOTT
password: TIGER
# Metadata parameters
catalog: '!'
schema: MYSCHEMA
tableNamePattern: '%'
tableNameInclude:
tableNameExclude:
tableTypes: TABLE
```
### JDBC driver
* Download:
* Web site:
* MVN Repository:
* JAR for Oracle versions 21c, 19c, 18c, and 12.2:
* **ojdbc11.jar** ( JDBC 4.3 / JDK11 and JDK17 )
* **ojdbc10.jar** ( JDBC 4.3 / JDK11 )
* **ojdbc8.jar** ( JDBC 4.2 / JDK8 and JDK11 )
* Driver class name: **oracle.jdbc.OracleDriver**
## Technical information about Oracle
### Structure
Server (instance) → **Database** → **User=Schema** → Tables/Objects
* **Database**: In Oracle, the "database" is the entire system of data files, control files, redo logs, etc. A database is tied to an **instance** (set of processes + memory structures). Usually, one instance ↔ one database, though RAC can have multiple instances for one database.
* **Schema**: In Oracle, a schema is essentially **a user account**.
When you create a user (`CREATE USER foo IDENTIFIED BY ...`), Oracle automatically creates a schema with the same name. That schema contains all objects owned by that user (tables, views, procedures, etc.).
There isn’t a concept of multiple schemas under one user; it’s a **1:1 mapping** (**user = schema**).
It is possible to query another user's objects (cross-schema access) if you have the permissions
### Boolean type
Unlike PostgreSQL or MySQL, **Oracle** has **no native BOOLEAN column type** (only PL/SQL supports it).\
That’s a very common pain point with Oracle.
The most common approach is to store boolean values in a column of type **NUMBER(1)**
\
This is the simplest, portable, and recommended way.\
For example it allows to use Hibernate without specific converter.
# H2 database
## Telosys database configuration
Below are examples of typical configurations for **H2** database.
### Since Telosys 4.3
```yaml
- id: h2-srv
name: my H2 database server with storage in file
type: H2
# JDBC connection
url: jdbc:h2:tcp://localhost:9092/D:/Z/db-data/mydatabase
user: sa
password: sa
# Metadata parameters (schema name in UPPER CASE)
schema: 'CARS'
```
### Before Telosys 4.3
```yaml
- id: h2-srv
name: my H2 database server with storage in file
type: H2
# JDBC connection
url: jdbc:h2:tcp://localhost:9092/D:/Z/db-data/mydatabase
driver: org.h2.Driver
user: sa
password: sa
# Metadata parameters (schema name in UPPER CASE)
catalog: '!'
schema: 'CARS'
tableNamePattern: '%'
tableTypes: TABLE
```
### JDBC driver
* The H2 JDBC driver is located in the single JAR provided by H2.
* JAR file example: `h2-2.3.232.jar`
* Driver class name : **org.h2.Driver**
## Technical information about H2
### Structure
**Database** → **Schema** → Tables/Objects
* **Database**: In H2, the "database" is basically the connection (in-memory or file). \
There’s only one database per connection.
* **Schema**: H2 supports schemas, similar to PostgreSQL and SQL Server. \
Default schema is `PUBLIC`. \
You can create others (`CREATE SCHEMA sales;`). Objects belong to schemas.
### H2 case conversion rules
* **Unquoted identifiers**
* Always **converted to UPPERCASE**, following the SQL standard.
* Applies to both **table names** and **column names**.
* **Quoted identifiers**
* Case is **preserved exactly as written**
* They are **case-sensitive** in SQL requests
### H2 modes
H2 can run in **3 main modes**:
1. **Embedded** (in-process)
* URL with data storage **in memory**:\
`jdbc:h2:`**`mem`**`:{database-name}`
* URL with data storage **in file**: \
`jdbc:h2:`**`{dir-path}`**`/{database-name}`
2. **Remote Server mode** (accepting external connections)
* URL with data storage **in memory**:\
`jdbc:h2:`**`tcp`**`://{host}:{port}``/`**`mem`**`:{database-name}`
* URL with data storage **in file**: \
`jdbc:h2:`**`tcp`**`://{host}:{port}``/`**`{dir-path}`**`/{database-name}`
For "SSL" replace "tcp" by "ssl"
3. **Mixed mode** (embedded + server at the same time)
# Derby database
## Telosys database configuration
Below are examples of typical configurations for a **PostgreSQL** database.
### Since Telosys 4.3
```yaml
- id: derby
name: my Derby server database
type: DERBY
# JDBC connection
url: jdbc:derby://localhost:1527/telosysdb;create=true
user: foo
password: xxxxx
```
### Before Telosys 4.3
```yaml
- id: derby
name: my Derby server database
type: DERBY
# JDBC connection
driver: org.apache.derby.jdbc.ClientDriver
url: jdbc:derby://localhost:1527/telosysdb;create=true
user: foo
password: xxxxx
# Metadata parameters
schema: '!'
# catalog: '!'
tableNamePattern: '%'
tableTypes: TABLE
```
* "*catalog*" is not required
* "*schema*" can be a schema name or '!' for all schemas
* if authentication is not enabled then "*user*" and "*password*" can have any value
### JDBC driver
* Download:
* JAR files required to connect (these 3 files must be present in the "lib" directory) :
* **`derbytools.jar`** ( org.apache.derby.jdbc.ClientDriver )
* **`derbyclient.jar`** ( org.apache.derby.client.ClientAutoloadedDriver )
* **`derbyshared.jar`** ( org.apache.derby.shared.common.info.ProductVersionHolder )
* Driver class name : **org.apache.derby.jdbc.ClientDriver**
## Technical information about Derby
### Structure
**Database** → **Schema** → Tables/Objects
* **Database**: In Derby, the "database" is basically the connection. \
There’s only one database per connection (each connection is tied to a single database).\
A **database** is essentially a **directory** on disk.
* **Schema**: Derby supports schemas, similar to PostgreSQL and SQL Server. \
In Derby, a schema is a namespace within a database.\
A schema contains tables, views, indexes, triggers, and procedures.\
Derby defaults schema = current user name (uppercased), \
for example if user = "sa" ⇒ schema is "SA".\
If connecting without credentials (no user) the default schema "APP" will be used
### Server Launch
Just launch **`bin/startNetworkServer`** ( default port = 1527 )
### Derby case conversion rules
Applies to both **table names** and **column names**.
* **Unquoted identifiers**
* Always **converted to UPPERCASE**
* They are not case-sensitive in SQL requests
* **Quoted identifiers**
* Case is **preserved exactly as written**
* They are **case-sensitive** in SQL requests
Default **schema** = **username in uppercase**.
### Derby types of use
Derby is written in Java, so it's possible to connect via **JDBC** with all **JVM languages**:
* **Java**
* **Kotlin**
* **Scala**
* **Groovy**
And also with some other languages:
* **Python** with **JayDeBeApi** that allows to connect from Python code to databases using Java JDBC
* **C# / .NET** via **ODBC** with a DB2-compatible driver or via **JDBC** with **IKVM.NET** (though that’s less common)
* **Node.js** via **JDBC bridges** (e.g., node-jdbc) with Derby’s JDBC driver
# Models and entities
A "Telosys model" is a model based on a set of text files written with the Telosys "Domain Specific Language". The Telosys DSL uses a very simple grammar to define entities with their attributes and relationships.
See pages below for more information:
* [Model structure](/models/model-structure)
* [Entity](/models/entity)
* [Attribute](/models/attribute)
* [Link](/models/link)
* [Annotations](/models/annotations)
* [Tags](/models/tags)
* [Examples](/models/examples)
* [Model creation](/models/model-creation)
* [Model installation](/models/model-installation)
* [Models management](/models/models-management)
# Model structure
### Model structure
Since version 4.0 each model is a **directory** located in "**TelosysTools/models**".
The **directory name** is the **model name**.
A model directory contains
* a file "**model.yaml**"
* n files "**.entity**" (1 for each entity)
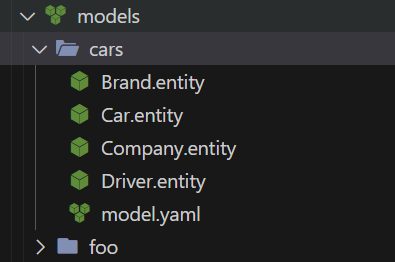
Example : model "**employees**"
The "model.yaml" contains basic informations about the model
Each ".entity" file defines an entity, see [Entity](/models/entity) page for more information about the grammar.
### How to use Git to clone and push a model?
See [Install with Git](broken://pages/P37qwNGxA9VBV9yiSFkU) and [Publish with Git](broken://pages/aAH24lA3MNXizn2RPiS1)
# Entity
### Entity file
Each entity is defined in a text file editable with any editor. \
The file name is composed of the **name of the entity** followed by the extension "**.entity**".
Examples :
```
Car.entity
Driver.entity
```
### Entity name
The entity name can be composed of : **letters**, **numbers** and "**\_**" (underscore). Other characters are not allowed. \
By convention the name usually starts with an upper case character. The entity name must be the same as the file name, for example if the file is "Car.entity" then the entity name must be "Car".
{% hint style="success" %}
Examples of **valid** entity names :
* **Car**
* **Car123**
* **CarOwner**
* **Car\_owner**
{% endhint %}
{% hint style="danger" %}
Examples of **invalid** entity names :
* **Car#12** ( "#" not allowed )
* **Car+Owner** ( "+" not allowed )
{% endhint %}
### Comments
Comments can be placed anywhere in the file.\
A comment starts with "**//**".\
All the end of line located after "//" is the comment.\
Comments are only "single line" (no multi lines comments).
Example :
```
xxx // the comment
```
### Entity structure
The entity structure is made up of the **name of the entity** followed by a block containing all of its **attributes and links**. The block containing the attributes and the links starts with **'{'** and ends with **'}'**. \
"End Of Line" characters are not significant. They are used only for readability. Potentially all the entity can be described in a single line.
Example :
```
EntityName {
// attributes
id : int { @Id } ; // attribute 'id'
name : string ; // attribute 'name'
// links
town : Town ; // link to the 'Town' entity
}
```
# Attribute
### Syntax
An attribute definition is composed of the following elements :
* **name**
* **":"** (separator)
* **type** (attribute "neutral type" )
* further information (optional) defined between **"{"** and **"}"**
* **annotations** (optional)
* **tags** (optional)
* **";"** (end of definition)
Syntax :
```
name : type { annotations and tags } ;
```
An attribute or link definition can span multiple lines. \
Example :
```
name : type {
annotations
tags } ;
```
### Name
The name can be composed of : **letters**, **numbers** and **"\_"** (underscore). Other characters are not allowed. By convention the name usually starts with a lower case character.
Each name must be unique in the entity.
{% hint style="success" %}
Examples of **valid** attribute names :
* **age**
* **firstName**
* **first\_name**
* **flag12**
{% endhint %}
{% hint style="danger" %}
Examples of **invalid** attribute names :
* **flag#12** ( "#" not allowed )
* **first-name** ( "-" not allowed )
* **$code** ( "$" not allowed )
{% endhint %}
### Attribute type
An attribute is a simple and unitary piece of data such as a string, a number, etc.
Its type is defined by a "**neutral type**" independent of any programming language.
Each "neutral type" will be converted into the target language type during generation.
Telosys offers automatic conversion for most used languages (Java, C#, etc, see [Target languages](/target-languages)).
### Available types
#### String or text type
string
standard "string" type
#### Numeric types
byte
8-bit integer range: -128 to +127
short
16-bit integer range: -32,768 to +32,767
int
32-bit integer range: -2,147,483,648 to +2,147,483,647
long
64-bit integer range: -9,223,372,036,854,775,808 to +9,223,372,036,854,775,807
float
single-precision 32-bit IEEE 754 floating point
double
double-precision 64-bit IEEE 754 floating point
decimal
arbitrary precision decimal number, not limited to 32 or 64 bits like float or double
#### Temporal types
date
to store a date year, month and day
time
to store a time hour, minute, second, and optionally nanosecond without time zone
datetime (since ver 4.3.0)
to store a date with the time year, month, day, hour, minute, second, and optionally nanosecond without time zone
datetimetz (since ver 4.3.0)
same as "datetime" but with "Time Zone Offset"
timetz (since ver 4.3.0)
same as "time" but with "Time Zone Offset"
timestamp
synonym for "datetime", deprecated since ver 4.3.0
#### Other types
boolean
to store "true"/"false" value
uuid (since ver 4.3.0)
"Universally Unique Identifier" (128-bit number used to uniquely identify information)
binary
to store a sequence of bytes
# Link
A **link** is a reference from an entity to another entity. It's a relationship with a cardinality (one to many, many to one, etc).
The syntax is similar to that of attributes; \
simply replace the neutral type with the **name of the referenced entity**.
To reference a **collection** of entities just add "**\[ ]**" after the entity name.
Examples:
```
department : Department ; // link = single Department
```
```
items : PurchaseOrderItem[] ; // link = collection of PurchaseOrderItem
```
### Cardinalities
#### "Many To One"
Example with 2 entities "**Employee**" and "**Department**"
* a Department can have many Employees
* each **Employee** works in **one Department**
So we have a "**Many-to-One"** relationship from Employee to Department\
**N employees → 1 department**
```
Employee {
department : Department ; // Many-to-One due to single reference to Department
}
```
When using a **single reference** to an entity the cardinality is "**Many-to-One**" **by default**.
#### "One To One"
Example with 2 entities "**Employee**" and "**Computer**"
* each Employee is assigned one Computer
* each Computer is assigned to one Employee
So we have a "**One-To-One**" relationship between Employee and Computer
To indicate that this is a "**one-to-one**" relationship, add the annotation **@OneToOne**
```
Employee {
computer : Computer { @OneToOne } ; // One-to-One due to single ref and "@OneToOne"
// Owning-side (with default FK)
}
```
```
Computer {
employee : Employee { @OneToOne @MappedBy(computer) } ;
// Inverse-side due to "@MappedBy"
}
```
#### "One To Many"
Example with 2 entities "**PurchaseOrder**" and "**PurchaseOrderItem**"
* each PurchaseOrder has many PurchaseOrderItem
* each PurchaseOrderItem is assigned to a single PurchaseOrder
So we have a "**One-to-Many"** relationship from PurchaseOrder to PurchaseOrderItem
```
PurchaseOrder {
items : PurchaseOrderItem[] ;
// One-to-Many due to "[ ]" (many references)
// mappedBy will be inferred from the owning side if possible
}
```
```
PurchaseOrder {
items : PurchaseOrderItem[] { @MappedBy(purchaseOrder) } ;
// One-to-Many due to "[ ]" (many references)
// mappedBy explicitly defined
}
```
#### "Many To Many"
Example with 2 entities "**Employee**" and "**Skill**"
* an Employee can have many Skills
* a Skill can be assigned to several Employees
So we have a "**Many-toMany**" relationship between Employee and Skill
In a relational database, a "**join table**" (association table) is required to represent a Many-to-Many relationship. In the Telosys model, this "join table" is materialized by a "**join entity**" (a special entity that allows the "join table" to be represented in the model).
```
@JoinEntity // marks this entity as a "join entity" (just for relationship)
EmpSkill {
empId : int { @Id @FK(Employee) @DbName(EMP_ID) }; // 1rst Foreign Key
skillId : long { @Id @FK(Skill) @DbName(SKILL_ID)}; // 2nd Foreign Key
}
```
```
Employee {
skills : Skill[] { @ManyToMany @LinkByJoinEntity(EmpSkill) };
// use @LinkByJoinEntity on the "owning-side" of the relationship
}
```
```
Skill {
employees : Employee[] { @ManyToMany @MappedBy(skills) @FetchTypeEager };
// use @MappedBy on the "inverse-side" of the relationship (like with JPA)
}
```
### Links and database joins
#### Link based on an explicit Foreign Key
When a Foreign Key is explicitly defined (with a name) in the entity (see the @FK annotation), \
it can be used in the link definition using **@LinkByFK(*****foreignKeyName*****)** .
Example
```
subjectId : int { @FK(FK_TICKET_SUBJECT, Subject) } ; // the Foreign Key
subject : Subject { @LinkByFK(FK_TICKET_SUBJECT) }; // the link based on FK
```
#### Link based on model attributes
When a foreign key is not explicitly defined in the entity, but all the attributes usable for the link are defined, it is possible to use them directly. To do this, use **@LinkByAttr(*****attributeName(s)*****)**
Example
```
empId : int ; // the attribute (its database column) usable for the link
employee : Employee { @LinkByAttr(empId) } ;
```
#### Link based on a join table
For a **Many-to-Many** relationship a join table is required, in the model this join table is materialized by a "**join entity**". The link "owning side" is defined with **@LinkByJoinEntity(*****joinEntityName*****)**
Example
### Other annotations for links
* **@Insertable(*****true*****|*****false*****)** and **@Updatable(*****true*****|*****false*****)**
* **@FetchTypeEager** and **@FetchTypeLazy**
* **@Cascade(*****type*****)**
* **@OrphanRemoval**
See [Annotations](/models/annotations)
# Annotations
Each **entity**, **attribute** or **link** can have **0 to N annotations**. \
Annotations provide additional information usable during the code generation. \
An annotation is a **predefined name** starting with "**@**". \
Some annotations may have **values** specified between "**(**" and "**)**". \
For attributes and links all annotations must be located in the block delimited by "**{**" and "**}**".
NB : since version 4.0 the useless comma between annotations is prohibited and must be removed
### @Abstract
Marks an entity as "abstract"
Scope : **entity** / Since : **4.0.0**
### @AggregateRoot
Marks an entity as "aggregate root" (useful to define "DDD aggregates" )
Scope : **entity** / Since : **4.0.0**
### @AutoIncremented
This annotation is a synonym/shortcut for "**@GeneratedValue(IDENTITY)**".\
The attribute value relies on the database’s auto-increment feature.\
Only applicable to numeric types.
Scope : **attribute** / Since : **2.0.0**
### @Cascade(string \[, string, ...] )
Defines how to manage ORM "cascade" options for a link \
Valid options : ALL or A, MERGE or M, PERSIST or P, REFRESH or REF, REMOVE or REM
Scope : **link** / Since : **4.1.0**
Examples :
`@Cascade(MERGE) @Cascade(REMOVE) @Cascade(MERGE,REMOVE) @Cascade(M,REM)`
### @Context(string)
Defines the context to which the entity belongs
Scope : **entity** / Since : **4.0.0**
### @DbCatalog(string)
Defines the database catalog to which the entity table belongs
Scope : **entity** / Since : **4.0.0**
### @DbComment(string)
The comment in the database (typically a column comment or table comment in a relational database)
Scope : **attribute & entity** / Since : **3.2.0** for attribute, **4.0.0** for entity
### @DbDefaultValue(string)
The default value in the database.
Scope : **attribute** / Since : **3.2.0**
### @DbName(string)
The name in the database (for example the column name in a relational database)
Scope : **attribute** / Since : **3.2.0**
### @DbSchema(string)
Defines the database schema to which the entity table belongs
Scope : **entity** / Since : **4.0.0**
### ~~@DbSize(string)~~
***Deprecated** - Do not use*
*Scope : attribute /* Since : 3.2.0
### @Db**Table(str**ing)
Defines the database table associated with the entity
Scope : **entity** / Since : **4.0.0**
### @Db**Tablespace(str**ing)
Defines the database tablespace where the entity table is located
Scope : **entity** / Since : **4.0.0**
### @DbType(string)
The attribute type in the database (for example the column type in a relational database)
Scope : **attribute** / Since : **3.2.0**
### @Db**View**
Marks the entity as a "view" in the database
Scope : **entity** / Since : **4.0.0**
### @DefaultValue(string)
The default value for an attribute
Scope : **attribute** / Since : **3.2.0**
### @Domain(string)
Defines the "domain" to which the entity belongs
Scope : **entity** / Since : **4.0.0**
### @Embedded
The entity referenced by the attribute must be embedded (typically for NoSQL databases).\
Applicable with "references" to embed them in the current entity.
Scope : **link** / Since : **3.0.0**
### @**Extends**(string)
Defines the "superclass" of an entity (inheritance)
Scope : **entity** / Since : **4.0.0**
### @FetchTypeEager
Define an "Eager Loading" fetch type for a link, typically for ORM (JPA, Doctrine, etc ).
Scope : **link** / Since : **3.3.0**
### @FetchTypeLazy
Define a "Lazy Loading" fetch type for a link, typically for ORM (JPA, Doctrine, etc ).
Scope : **link** / Since : **3.3.0**
### @FK( \[fkName,] referencedEntity\[.attribute] )
Define a "Foreign Key" or a "Foreign Key part"
Scope : **attribute** / Since : **3.3.0**\
\
Syntax :\
`// FK referencing an entity with a basic PK (single attribute)`\
`@FK( ReferencedEntity ) // without FK name (default name)`\
`@FK( ForeignKeyName, ReferencedEntity ) // with FK name`\
`---`\
`// FK referencing an entity with a compositePK (N attributes)`\
`@FK( ForeignKeyName, ReferencedEntity.ReferencedAttribute )`\
\
Examples :\
`// FK referencing "Brand" entity (with default FK name)`\
`brandId : int { @FK(Brand) }; // PK inference` \
`-----`\
`// FK referencing "Brand" entity (with default FK name)`\
`brandId : int { @FK(Brand.id) }; // explicit PK attribute`\
`-----`\
`// FK referencing "Group" entity (with FK name)`\
`groupCode : string { @FK(FK_EMP_GRP, Group) } ;`\
`-----`\
`// FK referencing "SubGroup" entity (composite PK)`\
`groupCode : string { @FK(FK_PER_SUBGRP, SubGroup.groupCode ) };` \
`subgroupId : int { @FK(FK_PER_SUBGRP, SubGroup.subgroupId) };`
### @Future
The attribute date value must be in the future (after current date).\
Usable for field validation rules. Applicable with "date" type.
Scope : **attribute** / Since : **2.0.0**
### @GeneratedValue(string \[, string, ...])
Defines the generated value strategy ("AUTO", "IDENTITY", SEQUENCE" or "TABLE") for an attribute. This is useful for ORM like JPA, etc.
Scope : **attribute** (applicable to **numeric types** only) / Since : **3.4.0**
Strategies:
* **AUTO** - the ORM chooses the most appropriate strategy
> @GeneratedValue(**AUTO**)
* **IDENTITY** - relies on the database’s auto-increment feature (int/long)
> @GeneratedValue(**IDENTITY**)
* **SEQUENCE** - uses a database sequence to generate the value
> @GeneratedValue( **SEQUENCE**, **sequenceName** \[, allocationSize \[, initialValue ] ] )\
> \- sequenceName = the sequence used to provided the generated value\
> \- allocationSize (optional) = ORM-level optimization, prefetching/batching in memory (for ORM like JPA/HIbernate)\
> \- initialValue (optional) = first generated value
* **TABLE** - simulates a sequence using a special table that stores the next value
> @GeneratedValue( **TABLE**, **pkValue** \[, allocationSize \[, initialValue ] ] )
> \
> \- pkValue = the primary key value used to store the current value in the special table \
> (must be unique to identify the entity/attribute)\
> \- allocationSize (optional) : ORM-level optimization, prefetching/batching in memory (for ORM like JPA/HIbernate)\
> \- initialValue (optional) = first generated value
### @Id
The attribute is the "ID" (or "Primary Key") for the current entity.\
For an entity with a composite ID (composite Primary Key), put this annotation on each attribute that is part of the ID.
Scope : **attribute** / Since : **1.0.0**
Applicable with any basic type.\
For a composite Primary Key just put an "@Id" annotation for each attribute that is part of the key.\
Examples :\
`Badge { // Simple key => single "@Id"`\
`id : int { @Id } ;`\
`name : string ;` \
`}`\
`SubGroup { // Composite key => multiple "@Id"`\
`groupCode : string { @Id } ;`\
`sectionId : int { @Id } ;`\
`name : string ;`\
`}`
### @InitialValue(string)
Sets the initial value of the attribute.
Scope : **attribute** / Since : **3.2.0**
### @InMemoryRepository
Marks an entity as fully stored in memory.\
All occurrences can be accessed directly in memory (can be useful for static datasets).
Scope : **entity** / Since : **4.0.0**
### @InputType(string)
Defines the input type usable for a field (for example an HTML input type).
Scope : **attribute** / Since : **3.2.0**
### @Insertable(boolean)
Defines if the link is "insertable" or not.
Scope : **link** / Since : **3.3.0**
Examples :
```
@Insertable(true)
@Insertable(false)
```
### @JoinEntity
Marks the current entity as a "Join Entity" (an entity referencing two other entities in order to manage a many-to-many relationship).
Scope : **entity** / Since : **4.1.0**
### @Label(string)
Defines a label usable for the attribute, for example in GUI (HTML label for an input field, etc)
Scope : **attribute** / Since : **3.2.0**
### @LinkByAttr(string \[, string, ...])
Defines a link based on the given attribute(s) name(s) referencing the Primary Key.
For multiple attributes (in case of composite PK) each attribute must define the referenced attribute in the target entity.
Scope : **link** / Since : **3.3.0**\
\
Syntax :
```
// simple PK with a single attribute :
@LinkByAttr(attributeName)
// composite PK with N columns (in PK order) :
@LinkByAttr(attributeName1, attributeName2 [, attributeNameX ] )
```
Example :
```
Point {
x : int { @Id @DbName(X) } ; // PK
y : int { @Id @DbName(Y) } ; // PK
name : string ;
}
Line {
id : int { @Id } ;
color : string ;
point1X : int { @DbName(X1) } ;
point1Y : int { @DbName(Y1) } ;
point2X : int { @DbName(X2) } ;
point2Y : int { @DbName(Y2) } ;
// LINKS
point1 : Point { @LinkByAttr(point1X , point1Y ) } ;
point2 : Point { @LinkByAttr(point2X , point2Y ) } ;
}
```
### @LinkByFK(string)
Defines a link based on the given Foreign Key name.
Scope : **link** / Since : **3.3.0**
Syntax :
```
@LinkByFK(foreignKeyName)
```
Example :
```
Area {
id : int { @Id } ;
name : string ;
// Foreign Key
countryCode : string { @FK(FK_AREA_COUNTRY, Country) } ;
// Link definition based on Foreign Key
country : Country { @LinkByFK(FK_AREA_COUNTRY) } ;
}
```
### @LinkByJoinEntity(string)
Defines a link based on the given "join entity" name.\
Usable with "many to many" links to define a "join table".
Scope : **link** / Since : **3.3.0**
Syntax :
```
@LinkByJoinEntity(entityName)
```
Example :
```
Employee {
id : int { @Id } ;
name : string ;
// EmployeeGroup is a "join entity" to associate employees and workgroups
workgroups : Workgroup[] { @ManyToMany
@LinkByJoinEntity(EmployeeGroup) } ;
}
```
### @LongText
Marks the attribute as "long text" (for example a text with several lines). \
This annotation can be used for HTML "text area" or database "CLOB".\
Applicable with "string" basic type.
Scope : **attribute** / Since : **2.0.0**
### @ManyToMany
Defines a "many to many" cardinality for a link.\
Usable for ORM code generation (JPA, etc)
Scope : **link** / Since : **3.3.0**
### @MappedBy(attributeName)
Defines the "mappedBy" attribute for a link.\
Usable for an "**inverse side**" relationship. \
Can be used with @OneToMany, @OneToOne, @ManyToMany\
(not with @ManyToOne, which is always the "owning side")
Scope : **link** / Since : **3.3.0**
Example :\
`shops : Shop[] { @MappedBy(employee) } ;`
### @Max(decimal)
To set the maximum acceptable value.\
Usable for field validation rules.\
Applicable with "numeric" types.
Scope : **attribute** / Since : **2.0.0**
### @Max**Len**(int)
To set the maximum acceptable length.\
Usable for field validation rules and GUI fields definition.
Scope : **attribute** / Since : **4.0.0** (replaces "@SizeMax" )
### @Min(decimal)
To set the minimum acceptable value.\
Usable for field validation rules.\
Applicable with "numeric" types.
Scope : **attribute** / Since : **2.0.0**
### @M**inLen**(int)
To set the minimum acceptable length.\
Usable for field validation rules and GUI fields definition.
Scope : **attribute** / Since : **4.0.0** (replaces "@SizeMin" )
### @NotBlank
The attribute value cannot be blank.\
Usable for field validation rules.
Scope : **attribute** / Since : **2.0.0**
### @NotEmpty
The attribute value cannot be empty.\
Usable for field validation rules.
Scope : **attribute** / Since : **2.0.0**
### @NotNull
The attribute value cannot be null.\
Usable for field validation rules and SQL databases.
Scope : **attribute** / Since : **2.0.0**
### @ObjectType
The attribute type must be converted to "object/wrapper type" in the target language (for example for Java).\
No effect if not supported by the target language.\
Applicable with any basic type.
Scope : **attribute** / Since : **2.0.0**
### @OneToOne
Defines a "one to one" cardinality for a link.\
Usable for ORM code generation (JPA, etc)
Scope : **link** / Since : **3.3.0**
### @Optional
Defines an "optional" relationship for a link.\
Usable for ORM code generation (JPA, etc)
Scope : **link** / Since : **3.3.0**
### @OrphanRemoval
Set 'orphanRemoval' to true in ORM (JPA, etc)
Scope : **link** / Since : **4.1.0**
### @Pa**ckage(string)**
Defines the "package" to which the entity belongs
Scope : **entity** / Since : **4.0.0**
### @Past
The attribute value must be in the past (before current date).\
Usable for field validation rules.\
Applicable with "date" type.
Scope : **attribute** / Since : **2.0.0**
### @Pattern(string)
Defines a pattern usable for field validation, for example a "RegEx" pattern.
Scope : **attribute** / Since : **3.2.0**
### @PrimitiveType
The attribute type must be converted to "primitive type" in the target language (for example for Java).\
No effect if not supported by the target language.\
Applicable with any basic type.
Scope : **attribute** / Since : **2.0.0**
### @ReadOnly
Marks the entity as "readonly"
Scope : **entity** / Since : **4.0.0**
### @Size(size)
Defines the attribute size.\
The size is defined with "precision" and "scale" if necessary (eg "6" or "6,2")
Scope : **attribute** / Since : **4.0.0**
### ~~@SizeMax(int)~~
***Deprecated** - Do not use - Use "**@MaxLen**" instead*
*Defines the maximum acceptable size of the attribute value*.\
*Scope : attribute /* Since : 2.0.0
### ~~@SizeMin(int)~~
***Deprecated** - Do not use - Use "**@MinLen**" instead*
*Defines the minimum acceptable size of the attribute value*.\
*Scope : attribute /* Since : 2.0.0
### @Transient
Define an attribute as "transient" (for example in a Java class or with an ORM like JPA)
Scope : **attribute & link** / Since : **3.3.0**
### @Un**iqu**e
Marks the attribute as unique for the entity.
Scope : **attribute** / Since : **4.0.0 *****(experimental)***
### @UnsignedType
The attribute type must be converted to "unsigned type" in the target language (for example for C/C++).\
No effect if not supported by the target language.\
Applicable with any basic type.
Scope : **attribute** / Since : **3.0.0**
### @Updatable(boolean)
Defines if the link is "updatable" or not.
Scope : **link** / Since : **3.3.0**
Examples :
```
@Updatable(true)
@Updatable(false)
```
# Tags
As Telosys aims to provide highly customizable models (and predefined annotations are usually not sufficient to handle all special cases) in version 3.3.0 "**tags**" have been added for attributes and since version 4.0.0 they can be used everywhere (entity, attribute and link).
Tags are a very simple way to easily customize your models by adding as much additional information as you want.
### Set tags in model
Each **entity**, **attribute** or **link** can have **0 to N tags**.
Like annotations, tags provide additional information usable during the code generation. But, unlike annotations, **tags do not have predefined names**. The user can define as many tags as he wants.
A tag is **any name** starting with "**#**" and optionally having a value.\
If the tag has a **value** then the value is defined between "**(**" and "**)**".
Examples of tags :
```
MyEntity {
id : int { @Id } ;
// tag "mytag" (without value) :
comment : string { #mytag } ;
// tag "OpenAPIFormat" with value :
val : long { #OpenAPIFormat(int64) } ;
}
```
### Use tags in templates
In a template you can define conditions based on the presence (or absence) of a tag \
and you can retrieve the value of a tag (with default value if necessary).
To do this, use the following syntax:
* $x.**hasTag**("tagName")
* $x.**tagValue**("tagName")
* $x.**tagValue**("tagName", "defaultValue")
* $x.**tagValueAsBoolean**("tagName", true/false)
* $x.**tagValueAsInt**("tagName", 123)
Example : check tag presence and use its value if present
```
#if ( $attrib.hasTag("OpenAPIFormat") )
$attrib.tagValue("OpenAPIFormat")
#end
```
See [Telosys objects](/bundles/telosys-objects) reference guide for detailed information \
(objects $entity, $attribute and $link).
# Examples
Sample models are available here:
Below some entities examples:
### Driver.entity
```
// Entity Driver
// Defines a person who is able to drive a car
Driver {
id : long { @Id } ;
firstName : string { @MaxLen(20) @NotEmpty } ;
lastName : string { @MaxLen(20) @NotEmpty } ;
birthDate : date { @Past };
certified : boolean ;
}
```
### Car.entity
```
// Entity Car
// with autoincremented id
Car {
// basic attributes
id : int { @Id @AutoIncremented } ;
name : string { @SizeMax(40) } ;
year : short { @Min(1900) @Max(2020) } ;
price : float { @Min(500) @Max(99999) };
// links (references to other entities)
brand : Brand ; // 1 Brand (ManyToOne)
driver : Driver[] ; // N Driver (OneToMany)
}
```
# Model creation
There are 2 ways to create a Telosys model :
* **creation from scratch** \
to create an empty model in which you can then create the entities you need
* **creation from an existing relational database** \
to create a model from a database with an entity for each table
### Creating a model from scratch
**Step #1 - Create a void model**
To create a model from scratch use the "**nm**" (New Model) command.
Syntaxe:
**`nm `**
\ -> the name of the new model to create
This command creates a new model with the given name.
This model is void, it does not contain any entity.
**Step #2 - Add entities to the model**
To add entities, use the "**ne**" (New Entity) command.
Syntaxe:
**`ne `**
This command creates a new entity with the given name -> a file "**entity-name.entity**"
You can now edit the ".entity" files of the model with any editor or IDE to define the attributes and links.
You can also "copy/paste" certain files if you have similarities between entities.
### Creating a model from a database
If you have a relational database with tables and links based on foreign keys then you have a relationship model. Telosys is able to build its own model from this database model.
To do so, you just have to define your database -> see the page "[Project databases](/project-databases)"
Once you have define the database and check the configuration with "cdb" command you can create a Telosys model from this database with the "**nm**" command.
Syntaxe:
**`nm `**
\ -> the name of the new model to create
\ -> the id of a database defined in "databases.yaml"
An entity will be created for each table matching the patterns defined in the database configuration.
You can check the entities created and if necessary you can customize them by editing the ".entity" files.
# Model installation
Since version 4.2.0 it's now possible to install models from a "depot".
A "depot" is a collection of Git repositories, each repository is a "model".
### Command "lmd"
The "**lmd**" command can be used to "List Models available in the Depot".
It can be used to see which models can be installed.
Syntax: **`lmd [model-name-part-1] [model-name-part-2] [model-name-part-N]`**
For more convenience, you can use only a part of the model name. If several models contain this part in their name then they will all be listed.
Examples:
* **`lmd`** -> show all available models
* **`lmd ord`** -> show all available models with “*ord*” in their name
* **`lmd ord car`** -> show all available models with “*ord*” or "*car*" in their name
### Command "im"
The "**im**" command means "Install Model(s)".\
It allows to install one or more models from the Depot.
Syntax: **`im model-name-part-1 [model-name-part-2] [model-name-part-N]`**
For more convenience, you can use only a part of the model name. If several bundles contain this part in their name then they will all be installed.
Examples:
* **`im ord`** -> install all models with “*ord*” in their name
* **`im ord car`** -> -> install all models with “*ord*” or "*car*" in their name
* **`im *`** -> install all models
Example: install all models with name containing "*ord*"
Note: \
When installing models with the “im” command, only models that do not exist locally are installed.\
In this way, it is not possible to overwrite a local model.
Example:
### Proxy configuration
These commands must use Internet to reach the depot. \
So, if you are using a **proxy** to access Internet, you must configure it in the project configuration file. \
See "**Network proxy configuration**" in "[Project configuration](/project-configuration)".
### Defining the depot containing the models
By default the depot is the GitHub organization containing the Telosys models examples.
You can define your own depot for models -> see "SpecificDepotForModels" in [Project configuration](/project-configuration)
Use the "**cfg**" command to see the current configuration including the "depot for models".
### How to install a model with Git clone?
See [Install with Git](broken://pages/P37qwNGxA9VBV9yiSFkU)
# Models management
### Current model
The current model is printed between "(...)" in the CLI prompt.
Example with "**cars**" as the current model: **`telosys#(cars)>`**
Use "**`m`**" command to set/unset the current model :
* `>m cars` -> set "cars" as current model
* `>m -none` -> no current model
All entities commands ( "le", "ne", ..) apply to the current model.
### Main commands for models management
**Model commands:**
* "**`m`**" Model : Set/print the current model
* "**`lm`**" List Models : List the project models
* "**`lmd`**" List Models in Depot : List models available in the depot
* "**`im`**" Install Model(s) : Install model(s) from the depot
* "**`nm`**" New Model : Create a new Telosys model (optionally from a database) .
* "**`em`**" Edit Model : Edit the current/given model .
* "**`cm`**" Check Model : Check the current/given model .
* "**`dm`**" Delete Model : Delete the current/given model
**Entity commands:**
* "**`le`**" List Entities : List the entities defined in the current model
* "**`ee`**" Edit Entity : Edit an entity file
* "**`ne`**" New Entity : Create a new entity in the current model
* "**`de`**" Delete Entity : Delete the given entity in the current model
# Bundles of templates
Telosys code generation is based on "**templates**".
A template is a text file composed of static parts and dynamic parts using statements and references to variables. There is a template file for each type of file to generate.
### Templates organisation
The Telosys templates are organised in "**bundles**".
A "**bundle of templates**" is a set of templates files designed to generate different target files that can work together.
For more information about "**bundles**" see:
* [Bundles of templates](/bundles/bundle-structure)
### Sample template bundles
Some examples are available here :
* [Bundles for Telosys 4.x (latest version)](https://github.com/telosys-templates)
* [Bundles for Telosys 3.x](https://github.com/telosys-templates-v3)
### Templates language
A template is a file with a "**.vm**" extension written in "**Velocity Template Language** (VTL)". Velocity is a well known Open Source template engine ( )
The **Velocity engine** used in Telosys is **version 1.7**
For more information about "**templates**" see :
* [Velocity language](/bundles/velocity-language)
* [Velocity directives](/bundles/velocity-directives)
* [Velocity object types](/bundles/velocity-objects)
* [Telosys directives](/bundles/telosys-directives)
* [Telosys variables](/bundles/telosys-variables)
* [Telosys objects](/bundles/telosys-objects)
* [Code snippets](/bundles/code-snippets)
# Bundle structure
A Telosys project may require a lot of templates, that's why the templates are organized in "**bundles**".
A "bundle" is just a set of "templates" (and sometimes resources) grouped together in a folder.
Thus it is possible to have clearly defined groups of templates for each part of the code to be generated (persistence, REST-API, DTO, HTML pages, testing, etc)
### What's in a bundle ?
Each bundle folder contains:
* 1 file "**templates.cfg**" (mandatory)
* 1 file "**README.md**" (to provide information about the bundle, optional)
* 1..N **templates** (Velocity "**.vm**" files)
* 0..N **resources** files (static files)
* any other useful file for the bundle
* 0..N subfolders (to organize the different files)
### The "templates.cfg" file
All code generation is driven by the "**templates.cfg**" file.
Each line of this file defines a genaration task with the necessary information:
* the **target file(s)** to generate
* the **target directory** in which to place the result
* the **template** to use
* the **type of execution**:
* **"\*"** : a code generation executed **multiple times** with the same template \
(1 generation for each selected entity)
* **"1"** : a code generation executed **only once** independently of entities
* **"R"** : a simple **resources files** copy in a destination folder (no template)
NB: if a template (".vm" file) is present in the bundle folder but not present in "templates.cfg", it will not be used.
### Variables usable in "templates.cfg"
For greater flexibility, variables can be used in the **target file name** and the **target directory name**.
* **${ENT}** ⇒ current **entity name** (since ver 4.2.0 )\
this variable is required for generation with type "\*" in order to generate a file for each entity
* ***${BEANNAME}*** ⇒ same as **${ENT}** deprecated since ver 4.2.0 ⇒ use ${ENT} instead
* **${BUN}** ⇒ current **bundle name** (since ver 4.2.0 )
* **${MOD}** ⇒ current **model name** (since ver 4.2.0 )
The following suffixes can be added to all of these variables:
* "**\_LC**" ⇒ conversion to "**lower case**". Examples: ${ENT\_LC}, ${MOD\_LC}
* "**\_UC**" ⇒ conversion to "**upper case**". Examples: ${ENT\_UC}, ${MOD\_UC}
It is also possible to use any variables defined in the **project configuration**:
* **standard predefined variables** \
like ${SRC}, ${RES}, ${WEB}, ${TEST\_SRC}, ${TEST\_RES}, ${DOC}, ${TMP}
* all other **specific variables**
### How to customize a bundle?
Telosys was designed to allow users to customize code generation. So, if you reuse existing bundles, you will probably want to change some its parts.
What you can do:
* modify existing templates (.vm files) with a text editor
* add new templates (.vm files) in the bundle (don't forget to reference them in "templates.cfg")
* delete certain templates (in this case you can only delete the line in "templates.cfg")
* add new resources (static files) to be copied
### How to use Git to clone and push a bundle ?
See [Install with Git](broken://pages/P37qwNGxA9VBV9yiSFkU) and [Publish with Git](broken://pages/aAH24lA3MNXizn2RPiS1)
# Bundle creation
The easiest way to create a new bundle is to copy and customize an existing one.
To do this, simply copy the entire bundle directory under the name of your choice, then customize the files to suit your needs.
If you want to create an empty bundle, follow these steps:
* Create the **bundle directory** in the Telosys bundles location ( "TelosysTools/templates" by default)
* In this new directory
* Copy an existing "**templates.cfg**" file and adapt it
* Create a "**README.md**" file (optional)
* Create (or copy/paste/modify) the **templates** files ("**.vm**" files) \
and reference each template in "templates.cfg"
# Bundles installation
The most efficient way to use templates is to install existing bundles and then adapt them to the specific needs of the project.
Bundles of templates can be installed from a “depot”. \
A "depot" contains several bundles, which are actually Git repositories. \
A "depot" can be a **GitHub organization** or a **GitHub user** (containing a Git repository for each bundle).
### Command "lbd"
The "**lbd**" command means "List Bundles available in the Depot".
It can be used to see which bundles can be installed.
Syntax: **`lbd [bundle-name-part-1] [bundle-name-part-2] [bundle-name-part-N]`**
For more convenience, you can use only a part of the bundle name. If several bundles contain this part in their name then they will all be listed.
Examples:
* **`lbd`** -> show all available bundles
* **`lbd java`** -> show all available bundles with “*java*” in their name
* **`lbd java php`** -> show all available bundles with “*java*” or "*php*" in their name
### Command "ib"
The "**ib**" command means "Install Bundle(s)".\
It allows to install one or more bundles from the Depot.
Syntax: **`ib bundle-name-part-1 [bundle-name-part-2] [bundle-name-part-N]`**
For more convenience, you can use only a part of the bundle name. If several bundles contain this part in their name then they will all be installed.
Examples:
* **`ib php`** -> install all bundles with “*php*” in their name
* **`ib php java`** -> install all bundles with “*php*” or "*java*" in their name
* **`ib *`** -> install all bundles
Example: install all bundles with name containing "java"
Note: \
When installing bundles with the “ib” command, only bundles that do not exist locally are installed.\
In this way, it is not possible to overwrite a local bundle that may contain specialized templates for the current project.
Example:
### Proxy configuration
These commands must use Internet to reach the depot. \
So, if you are using a **proxy** to access Internet, you must configure it in the project configuration file. \
See "**Network proxy configuration**" in "[Project configuration](/project-configuration)".
### Defining the depot containing the bundles
By default the depot is the GitHub organization containing the Telosys bundles examples.
You can define your own depot for bundles -> see "**SpecificDepotForBundles**" in [Project configuration](/project-configuration)
Use the "**cfg**" command to see the current configuration including the current "depot for bundles".
### How to install a bundle with Git clone?
See [Install with Git](broken://pages/P37qwNGxA9VBV9yiSFkU)
# Bundles management
### Current bundle
The current bundle is printed between "\[...]" in the CLI prompt.
Example with "**java-jdbc**" as the current bundle: **`telosys#[java-jdbc]>`**
Use "**`b`**" command to set/unset/print the current bundle:
Syntax: **`b [bundle-part-name] [-none]`**
For more convenience, you can use only a part of the bundle name\
(if several bundles contain this part in their name then the command just says "ambiguous")
Examples:
* **`b`** -> print the current bundle
* **`b java-jdbc`** -> set "*java-jdbc*" as current bundle
* **`b jdbc`** -> set "*java-jdbc*" as current bundle \
if "*java-jdbc*" is the only bundle with "*jdbc*" in its name
* **`b -none`** -> unset the current bundle
{% hint style="info" %}
Once you have defined a **current model** and a **current bundle** \
the Telosys prompt looks like this:\
**`telosys#(model-name)[bundle-name]>`**
{% endhint %}
### Main commands for bundles management
**Bundles commands:**
* "**`b`**" Bundle: Set/print the current bundle
* "**`lb`**" List Bundles : List the project bundles
* "**`lbd`**" List Bundles in Depot : List bundles of templates available in the depot
* "**`ib`**" Install Bundle(s) : Install bundle(s) of templates available in the depot
* "**`eb`**" Edit Bundle : Edit the 'templates.cfg' file of the given bundle
* "**`db`**" Delete Bundle : Delete the current/given bundle
**Template commands:**
* "**`lt`**" List Templates : List the templates for the current bundle
* "**`et`**" Edit Template : Edit a template (.vm) file
# Velocity language
The **Velocity engine** used in Telosys is **version 1.7**
For more information about the Velocity Templates Language (VTL) see the official web site :
* **User guide** :
* **Reference guide** :
## References (variables and objects)
A template is a text file mixing fixed parts and dynamic parts based on references to variables and objects. A **reference** to a variable or an object starts with "**$**".
⇒ **Shorthand Reference Notation**
Example :
* **$foo** : content of **variable** "*foo*"
* **$customer.address** : get **property** "*address*" in object "*customer*"
* **$person.isVIP()** : call **method** "*isVIP()*" in object "*person*"
**⇒ Formal Reference Notation**
This notation uses "**{**" and "**}**" to clearly delimit the beginning and end of the reference name.\
It can be used to avoid ambiguities.
Examples :
* **${foo}**
* **${customer.address}**
* **${person.isVIP()}**
**⇒ Silent Reference Notation**
Telosys uses the VTL parser in "strict" mode, which means that the VTL "silent notation" using a "**`!`**" character at the beginning of the reference name (e.g. `$!abc` or `$!{abc}` ) has **no effect**. \
All references must be defined (initialized) before using them. \
If the reference is not defined an error will occur (even with "!")
Examples:
```velocity
Current entity is ${entity.name}
#foreach( $attrib in $entity.attributes )
Do something with $attrib.name and $attrib.type
#end
```
## Comments
A part of line starting with **"##"** is a single line comment. \
All lines between "**#\***" and **"\*#"** are a comment block.
```velocity
## This is a single line comment.
#set($x = 12)## init variable x
#*
This is a multi-lines comment
with 1 to N lines
*#
```
{% hint style="info" %}
The single-line comment (**##**) removes the "end of line", \
so you can use it to concatenate multiple lines into one. \
Example:\
`aaa`` `**`##`**\
`bb`` `**`##`**\
`cc`\
Result:\
`aaa bb cc`
{% endhint %}
## Unparsed content
All lines between "**#\[\[**" and **"]]#"** are not parsed by Velocity, they are rendered as is.\
So characters like "#" or "$" can be used anywhere.
The **#\[\[ do not parse me ]]#** syntax allows to easily use large chunks of uninterpreted and unparsed content in a template.
```
#[[
This part is not parsed, it is rendered as text (without Velocity interpretation)
Blablabla #include blabla
#set #break #if $a
]]#
```
## Literals
### String literals
When using the #set directive, strings that are enclosed in **double quote** characters will be **parsed**. But if the string literal is **enclosed in single quote characters**, it will **not be parsed**. A string literal can contains multiple lines.
```velocity
#set($s = "abc $i")## 'i' is replaced by its value
#set($s = 'abc $i')## no variable substitution
#set($s =
'line 1 $a
line 2 $b
line 3 $c')## 3 lines in the string
```
Escaping quotes in literal strings \
Just double the same type of quotes (single/double quote) used to wrap the string.
```velocity
#set($txt = "It's a ""literal"" string" )
#set($txt = 'It''s a "literal" string' )
```
### Numbers literals
Same as in all languages: 0 to 9 plus ' . '
Examples:
```velocity
#set($x = 12)## Integer
#set($y = 12.34)## Double
```
### Boolean literals
Just **true** and **false**
Examples:
```velocity
#set( $b = true )
#set( $b = false )
```
## Operators
### Comparison operators
Examples (showing different operators):
Operator
Symbol
Text
Example
Operator
Symbol
Text
Example
Equals / number
==
eq
#if( $foo == 42 )
Equals / string
==
eq
#if( $foo == "bar" )
Equals / object
==
eq
#if( $foo == $bar )
Not Equals
!=
ne
#if( $foo != $bar )
Greater Than
>
gt
#if( $foo > 42 )
Less Than
<
lt
#if( $foo < 42 )
Greater Than or Equal To
>=
ge
#if( $foo >= 42 )
Less Than or Equal To
<=
le
#if( $foo <= 42 )
Note:\
The == operator can be used to compare numbers, strings, objects of the same class, or objects of different classes. In the last case (when objects are of different classes), the toString() method is called on each object and the resulting Strings are compared.
### Logical operators
Operator
Symbol
Text
Operator
Symbol
Text
Logical AND
&&
and
Logical OR
||
or
Logical NOT
!
not
Examples :
```velocity
#if ( $v > 100 && $v < 200 )
Between 100 and 200
#end
#if ( $v == 100 || $v == 102 || $v == 123 )
Var is 100 or 102 or 123
#end
#if ( ! ( $v == 100 || $v == 101 ) )
Var is not 100 or 101
#end
```
### Arithmetic operators
| Operator | Symbol | Example |
| -------------- | ------------- | ---------------------- |
| Addition | **+** | `#set( $r = $a + $b )` |
| Subtraction | **-** | `#set( $r = $a - $b )` |
| Multiplication | **\*** | `#set( $r = $a * $b )` |
| Division | **/** | `#set( $r = $a / $b )` |
| Modulo | **%** | `#set( $r = $a % 10 )` |
| Increment | (no operator) | `#set( $a = $a + 1 )` |
| Decrement | (no operator) | `#set( $a = $a - 1 )` |
Note: when the "+" operator is used with 2 strings, it concatenates these 2 strings.
### Range operator
The range operator creates an **array of integer objects**. It can be used in conjunction with #set and #foreach statements.\
Syntax : `[ first .. last ]`
Examples :
```velocity
## Range from 1 to 5
#foreach( $i in [1..5] )
$i
#end
## Range from 10 to 12 (size : 3 )
#set( $r = [ 10 .. 12 ] )
range size : $r.size()
#foreach( $i in $r )
$i
#end
## Range from var to var
#set( $a = 4 )
#set( $b = 8 )
#foreach( $i in [$a..$b] )
$i
#end
## Range in reverse order
#foreach( $i in [ 4 .. -2 ] )
$i
#end
```
# Velocity directives
A directive is a Velocity keyword starting by a "**#**", for example "#set", "#if", "#foreach", etc.
Directives can be thought of as "instructions" for handling rendering in a model. They can be used to define variables (#set), apply logical conditions (#if), iterate over collections (#foreach), etc.
```velocity
#set( $name = "Bob" )
#foreach( $v in $elements )
$v
#end
```
To avoid misinterpretations the name of the directive can be bracketed with "{" and "}"
```velocity
#if($x)true#{else}false#end
```
## Most used directives
### #set
The #set directive is used for setting a value. A value can be assigned to either a simple variable or an object property.\
"#set" always defines a "global variable" wherever you use it.
```velocity
#set( $name = "Bob" )
#set( $customer.name = "Bob")
#set( $user.level = 3 ) ## number literal
#set( $a = $b ) ## variable reference
#set( $mylist = [ "A", $v, "Z"] ) ## list
```
You cannot set a variable to "null" explicitly
```velocity
#set( $v = null ) ## causes an error
```
NB : if the value to be assigned is null then it will not be assigned!
```velocity
#set( $v = $o.get("abc") )
## if get returns null then $v remains unchanged
```
### #foreach / #end
The "#foreach" directive is used to loop through a list of objects. Within the "#foreach" directive 2 local variables are created to represent :\
\- the **current item** in the loop (you can name it as you want)\
\- the "**$foreach**" object providing properties like "count", "index", "hasNext", "first", "last", "parent", "topmost".\
The visibility of these variables is only "local" (visible only in the "#foreach" block). \
A variable defined with "#set" inside a "#foreach" block remains global (visible outside of the block).\
The "$foreach" object is an instance of org.apache.velocity.runtime.directive.ForeachScope.
Examples :
Loop with given values :
```velocity
#foreach ( $item in [1..8] ) ## from 1 to 8
. item = $item
#end
#foreach ( $item in [3,2,1] ) ## from 3 to 1
. item = $item
#end
## Everything in a single line
#foreach( $item in ['A','B','C','D'] ) ${item}#end
```
Loop with an object (array, list, collection) :
```velocity
#foreach( $attribute in $entity.attributes )
$attribute.type $attribute.name
#end
```
Map iteration :
```velocity
#set ( $map = {"banana" : "good", "cream" : "bad"} )
#foreach($key in $map.keySet() )
$key --> $map.get($key)
#end
```
Break the current iteration :
```velocity
#foreach ( $item in [1..20] )
#if ( $item > 3 ) #break #end
. item = $item
#end
```
**"$foreach" object:**
When you are in a "**#foreach**" directive it is possible to use the Velocity object "**$foreach**". \
It provides information about the current iteration (index, count, etc)
$foreach attributes:
* **`$foreach.index`**: The current iteration index, starting from 0.
* **`$foreach.count`**: The current iteration count, starting from 1.
* **`$foreach.hasNext`**: A boolean value that is true if there are more elements to iterate over.
* **`$foreach.first`**: A boolean value that is true if the current iteration is the first one.
* **`$foreach.last`**: A boolean value that is true if the current iteration is the last one.
* **`$foreach.parent`**: same type of object but in the parent loop's context
* **`$foreach.topmost`**: same type of object but in the topmost (outermost) loop's context
"**$foreach.count**" loop counter ( 1 to N ) :
```velocity
#foreach ( $item in ["A", "B", "C", "D" ] )
. $foreach.count : $item
#end
```
"**$foreach.index**" zero-based index ( 0 to N-1 ) :
```velocity
#foreach ( $item in ["A", "B", "C", "D" ] )
. $foreach.index : $item
#end
```
"**$foreach.hasNext**" ( true if not last item ) :
```velocity
#foreach( $customer in $customerList )
$customer.Name#if( $foreach.hasNext ),#end
#end
```
Nested loops :
It's possible to access outer loops properties by using "**$foreach.parent**" or "**$foreach.topmost**" \
(e.g. $foreach.parent.index or $foreach.topmost.hasNext).
```velocity
#foreach ( $item1 in ["A", "B", "C", "D" ] )
#foreach ( $item2 in [1,2,3 ] )
. $foreach.index : $item1 / $item2
($foreach.parent.index) ($foreach.topmost.index)
#end
#end
```
### #if / #else / #**elseif** / #end
Conditional output or instructions
Examples :
**#if / #end :**
```velocity
#if ( $v == 1 ) equals 1 #end
#if ( $v == 1 )
equals 1
#end
```
**#if / #else / #end :**
```velocity
#if ( $v == 1 ) equals 1 #else not equals 1 #end
#if ( $v == 1 )
equals 1
#else
not equals 1
#end
```
**#if / #elseif / #else / #end :**
```velocity
#if ( $v == 1 )
equals 1
#elseif ( $v == 2 )
equals 2
#else
other
#end
```
### #include
The **#include** directive allows to import a local file at the current position. The file is included "as is" (as a text file, not rendered through the template engine, not parsed).\
If more than one file will be included, they should be separated by commas. A variable can be used instead of a literal filename.\
Any files to which #include refers must be included under "TEMPLATE\_ROOT" ( the "bundle" directory for Telosys ).
Examples :
```velocity
## Include a single file :
#include( "myfile.txt" )
#include( "include/myfile.txt" )
## Include multiple files :
#include( "a.txt", "b.html" )
## Include with variables :
#include( $myfile )
#include( "header.include", $myfile )
```
### #parse
The **#parse** directive allows to import a local Velocity template file. \
The file is parsed by the Velocity engine. Only one argument is accepted (only one file for each call, other arguments are ignored). A variable can be used instead of the literal filename.\
All the variables defined before the "#parse" call are usable in the parsed file. All the variables defined in the parsed file are usable in the primary file after the "#parse" call.\
Any templates to which #parse refers must be included under "TEMPLATE\_ROOT" ( the "bundle" directory for Telosys ).
Examples :
```velocity
#parse("foo.vm")
#parse($myfile)
#parse("include/initvar.vm")
## Here we can use variables defined in "initvar.vm"
```
\#parse can be used inside "parsed files".\
Recursion is permitted (with a condition to stop recursion).
Primary file :
```velocity
#set( $count = 8 )
#parse( "foo.vm" )
```
"foo.vm" file with recursive "parse" :
```velocity
#set( $count = $count - 1 )
#if( $count > 0 )
#parse( "foo.vm" )
#else
End of recursion.
#end
```
## Other directives
### #stop
The **#stop** directive stops any further rendering and execution of the template. This is true even when the directive is nested within another template accessed through **#parse** or located in a velocity **macro**.
The resulting output will contain all the content up to the point the #stop directive was encountered. This is handy as an early exit from a template.
Example :
```velocity
#if ( $v == 12 )
#stop
#end
```
### #break
The **#break** directive stops any further rendering of the current "execution scope". \
An "execution scope" can be \
\- a **directive with content** : #foreach, #parse, #evaluate, #define, #macro, or #@somebodymacro\
\- the **current template** ("root scope").\
Unlike #stop, #break will only stop the innermost, immediate scope, not all of them.
Examples :
```velocity
## BREAK at template level (stop template rendering)
#break
## BREAK in a single loop
#set($mylist = ["A", "B", "C", "D", "E", "F" ])
#foreach( $v in $mylist )
#if( $foreach.count > 3 )
#break
#end
$foreach.count : $v
## BREAK in a nested loop (break innermost)
#set($mylist1 = ["A", "B", "C", "D", "E", "F" ])
#set($mylist2 = [1, 2, 3, 4, 5, 6 ])
#foreach( $v1 in $mylist1 )
#foreach( $v2 in $mylist2 )
#if( $foreach.count > 3 )#break
#end
$foreach.parent.count : $v1 / $foreach.count : $v2
#end
#end
```
### #evaluate
The **#evaluate** directive can be used to dynamically evaluate a statement (piece of Velocity code). This allows to evaluate a string that is created dynamically at render time. '#evalute' works like '#parse' but with content that comes from a variable in memory instead of a file (it's possible to evaluate multiple lines).
Examples :
```velocity
#set($v = 2)
#set($statement = '#set($r = $v * 10)' )
#evaluate($statement)
v : $v
statement : $statement
r : $r ## r : 20
```
### #macro
Velocity "macros" allow you to define a portion of VTL code which will then be reusable several times. They are often called "Velocimacro".
Example : basic macro (without argument)
```velocity
#macro( three )
#set ( $result = "" )
#foreach ( $i in [1..3] ) ${i}#end
#end
## -------
#three()
```
Arguments : \
A Velocimacro can take any number of arguments (0 to N arguments). When the Velocimacro is invoked, it must be called with the same number of arguments with which it was defined. Each argument is a local variable and can never be used outside.
Example : macro with 2 arguments
```velocity
#macro( add $a1 $a2 )
#set ( $r = $a1 + $a2 )
$a1 + $a2 = $r
#end
## -------
#add( 20, 3 )
## rendering : 20 + 3 = 23
```
NB : Macros are not functions, they are designed to render and they cannot return a value. But you can simulate a "return value" by setting a variable in the macro and using it after calling the macro or by setting the result as a string.
Example : "Function like call" getting the result as text (with quotes)
```velocity
#macro( add3 $a1 $a2 $a3 )
#set ( $r = $a1 + $a2 + $a3)
$r## NO EOL
#end
## -------
#set($v = 50)
#set( $result = "#add3(10,20,$v)" )
result : $result
```
**Macro with body content**
It is possible to call a macro and pass it a text (1 to N lines). To do so call the macro with '**@**' between '#' and the macro name ( **#@mymacro()** ) . With this type of call you can add the text to pass after the call using '**#end**' to mark the end of the text. In the macro definition the text can be retrived via the '**$bodyContent**' reference (special reference defined only for macro).
```velocity
#macro(xml)
$bodyContent
#end
## ------------------------
#@xml()line1
line2
line3#end
```
### #define
The #define directive allows to assign a **block of code** to a **variable**. The associated block of code can contain any valid code.
The code associated with a variable by #define is executed **when the variable is referenced**.
The type of the variable created by #define is org.apache.velocity.runtime.directive.Block$Reference
Example :
```velocity
#define( $block )Hello $who#end
#set( $who = 'World!' )
$block
```
Differences between "#define" and "#macro" : "\
\- #macro" accepts parameters so that they provide a context for creation of local variables \
\- "#define" structure (unless it contains macros) only works with global variables
# Velocity object types
## Basic types
### String
Each string value is stored internally in a "*String*" Java object\
( see "java.lang.String" for details ).
Initialization :
```velocity
#set( $str = "abc" )
#set( $r = "xx${str}yy" ) ## r : "xxabcyy"
#set( $r = "xx" + $str + "yy" ) ## r : "xxabcyy"
```
String methods usage examples :
```velocity
length : $str.length()
#set($str2 = $str.replaceFirst("def", "xy" ) )
#if ( $str.endsWith("ef") ) YES #end
#if ( $str.equalsIgnoreCase("AbC") ) YES #end
toUpperCase() : $str.toUpperCase()
toLowerCase() : $str.toLowerCase()
```
### Integer
Each integer value is stored internally in a "Integer" Java object\
( see "java.lang.Integer" for details ).
Initialization :
```velocity
#set( $i = 123 )
```
Calculations :
```velocity
#set( $r = $i + 1000 ) ## r = 1123
#set( $r = $i - 23 ) ## r = 100
#set( $r = $i * 10 ) ## r = 1230
#set( $r = $i / 2 ) ## NB : r = 61 (!) (int)
#set( $r = $i / 2.0 ) ## r = 61.5
#set( $r = $i.doubleValue() / 2 ) ## r = 61.5
```
### Double
Each double value is stored internally in a "Double" Java object\
( see "java.lang.Double" for details ).
Initialization :
```velocity
#set( $d = 123.45 )
```
### Boolean
Each boolean value is stored internally in a "Boolean" Java object\
( see "java.lang.Boolean" for details ).
Initialization :
```velocity
#set( $b = true )
#set( $b = false )
#set( $b = $mylist.isEmpty() )
```
## Collections
### List
Object containing a list of any type of values.\
The values are stored internally in a "*ArrayList*" Java object\
( see java.util.ArrayList for details ).
Even if it's not a real "Java array", this object is often considered as an "*array*" in many Velocity documentations..
Initialization :
```velocity
## 4 numbers from 1 to 4 (with range operator)
#set( $mylist = [1..4])
## void list
#set($mylist = [])
## 6 values with diferent types
#set( $mylist = [1, 2, 3, "A", true, 65.78] )
```
Print content :
```velocity
mylist content : $mylist
--- OUTPUT :
mylist content : [1, 2, 3, A, true, 65.78]
```
Print all items with "#foreach"\
( "$foreach.count" goes from 1 to length, it's a count not an index ) :
```velocity
#foreach ( $item in $mylist )
- $foreach.count : $item
#end
--- OUTPUT :
1 : item = 1
2 : item = 2
3 : item = 3
4 : item = A
5 : item = true
6 : item = 65.78
```
Print a single item by index (the index goes from 0 to length-1) :
```velocity
item 0 : $mylist[0]
--- OUTPUT :
item 0 : 1
$list.get(0) ## with Java get() method
--- OUTPUT :
item 0 : 1
item 3 : $mylist[3]
--- OUTPUT :
item 3 : A
item 6 : $mylist[6]
--- ERROR :
Index 6 out of bounds for length 6
```
Change list content :
```velocity
#set( $mylist[2] = "CCC" ) ## index starts at 0
#set( $z = $mylist.add("new item") )
#set( $z = $mylist.remove("A") )
#set( $z = $mylist.removeAll( [1, 2, true, "Y"] ) )
## 'set($z=..)' is a work around to avoid printing
## the return value from 'add', 'remove', etc
```
Other examples :
```velocity
isEmpty : $mylist.isEmpty()
#if ( $mylist.isEmpty() ) list is void #end
size : $mylist.size()
#if ( $mylist.size() > 0 ) list is not void #end
$mylist.indexOf("A") ## OUTPUT : 3 (found at index 3)
$mylist.indexOf("Z") ## OUTPUT : -1 (not found)
$mylist.contains("A") ## OUTPUT : true (found)
$mylist.contains("Z") ## OUTPUT : false (not found)
$mylist.subList(1,3) ## from 1 to 2 (3 is exclusive)
```
### Map
Object containing Key-Value associations.\
The "key-value" pairs are stored internally in a "*LinkedHashMap*" Java object (see "java.util.LinkedHashMap" for details)
Initialization :
```velocity
### A map with 2 elements (key-value)
#set( $mymap = {"k1" : "v1" , "k2" : "v2"} )
### Void map
#set( $mymap = {} )
```
Print content :
```velocity
mymap content : $mymap
--- OUTPUT :
mymap content : {k1=v1, k2=v2}
## print VALUES
#foreach($v in $mymap )
. $v
#end
## print KEYS with Java "keySet()"
#foreach($k in $mymap.keySet() )
. $k
#end
## print KEYS and VALUES with Java "entrySet()"
#foreach($e in $mymap.entrySet() )
. $e.key : $e.value
#end
```
Get value by key (if the key doesn't exist in the map the error " : no attribute '\[' " occurs)
```velocity
k1 : $mymap["k1"]
k2 : $mymap["k2"]
k3 : $mymap["k3"] ## error (due to no key "k3")
```
Get value by key with default value if key not in map (secure, no error):
```velocity
k1 : $mymap.getOrDefault("k1", "default_value")
```
Each map key is also usable as an object's property then it's possible to get its value using the "object dot notation":
```velocity
k1 : $mymap.k1
k2 : $mymap.k2
k3 : $mymap.k3 ## error (due to no key "k3")
```
Set an entry in the map (add or update a key-value pair):
```velocity
#set( $mymap["k0"] = "v0" )
```
Remove an entry by key (error if the key doesn't exist in the map):
```velocity
#set( $unused = $mymap.remove("k1") )
## "#set" is just to avoid to print the return value (here "v1")
## NB: error if the key doesn't exist in the map
## key not found => return null => Velocity error
## workaround with "if exist" before remove:
#if($mymap.containsKey($key))#set($unused=$mymap.remove($key))#end
```
Remove an entry by key and value (secure, no error if no match):
```velocity
#set( $unused = $mymap.remove("k1", "v1") )
## "#set" is just to avoid to print the return value (boolean)
```
Other examples using the Java map methods :
```velocity
isEmpty : $mymap.isEmpty()
#if ( $mymap.isEmpty() ) void #end
size : $mymap.size()
#if ( $mymap.size() > 0 ) not void #end
#if ( $mymap.containsKey("k1") ) K1 FOUND #end
#if ( $mymap.containsValue("v2") ) V2 FOUND #end
## Remove element by key
#set($removed = $mymap.remove("k1") )
#if ( ! $mymap.containsKey("k1") ) K1 NOT FOUND #end
## Get all values
#foreach($v in $mymap.values() )
. $v
#end
## Get all keys
#foreach($key in $mymap.keySet() )
. $key
#end
## Clear map (return void so no resulting output)
$mymap.clear()
```
### Array
"Pure array" object that can be obtained from other objects.
The values are stored internally in a "*Object \[ ]* " instance. And therefore it doesn't have all the features offered by a List. An array does not support operations changing its size ( add, remove, removeAll, etc)
Initialization :
```velocity
#set( $array = $mylist.toArray() )
```
Print all items with "#foreach"\
( "$foreach.count" goes from 1 to length, it's a count not an index ) :
```velocity
#foreach ( $item in $array)
$foreach.count : $item
#end
--- OUTPUT :
1 : item = A
2 : item = B
3 : item = C
4 : item = D
```
```velocity
#set($last = $array.size() - 1 ) ## last index
#foreach ( $i in [0..$last] ) ## index 'range'
// index : $i --> element : $array[$i]
#end
--- OUTPUT :
// index : 0 --> element : A
// index : 1 --> element : B
// index : 2 --> element : C
// index : 3 --> element : D
```
Change value :
```velocity
#set( $array[2] = "newValue" ) ## index starts at 0
```
Other examples :
```velocity
isEmpty : $array.isEmpty()
#if ( $array.isEmpty() ) is void #end
size : $array.size()
#if ( $array.size() > 0 ) is not void #end
$array.contains("B") ## OUTPUT : true (found)
$array.indexOf("B") ## OUTPUT : 1 (found at index 1)
```
# Telosys directives
In addition to the standard Velocity language syntax, Telosys provides some specific "directives".
These directives can be useful to simplify writing or debugging templates.
## #assertFalse
( Telosys specific directive - since version 2.0.7 )
Checks that the value of the first argument is FALSE.\
Otherwise throws an error with the given message.
Examples :
```velocity
#assertFalse( $flag, "Flag is true (false expected)" )
#assertFalse( $entity.hasCompositePrimaryKey(), "Composite Primary Key not supported" )
```
## #assertTrue
( Telosys specific directive - since version 2.0.7 )
Checks that the value of the first argument is TRUE.\
Otherwise throws an error with the given message.
Examples :
```velocity
#assertTrue( $flag, "Flag is not true!" )
#assertTrue( $entity.hasPrimaryKey(), "Primary Key required!" )
```
## #cancel
( Telosys specific directive - since version 3.3.0 )
Cancels the current generation. \
When "#cancel" is used in a template the target file is not generated. This directive is useful when certain entities are not supposed to be generated. A cancellation is not considered as an error (no reported in errors).
This directive has only one argument: a message to indicate why the generation was canceled
Examples :
```velocity
#if ( $entity.name.startsWith("Abcd") )
#cancel("No JPA class for this entity")
#end
```
## #checkId
( Telosys specific directive - since version 3.0.0 )
Checks the existence of ID/Primary Key in the given entity.\
Throws an error if there's no ID/Primary Key defined in the entity.
Examples :
```velocity
#checkId( $entity)
```
## #error
( Telosys specific directive - since version 2.0.7 )
Throws an error with the given message
Examples :
```velocity
#if( $flag )
#error( "Flag is true!" )
#end
#if( ! $entity.hasPrimaryKey() )
#error( "Primary Key required!" )
#end
```
## #using
( Telosys specific directive - since version 2.0.7 )
Declares that the current template will use unusual objects or variables which must therefore be defined in the context.\
This directive verifies that all required objects or variables are defined in the Velocity context.\
It throws an error if one of the given objects is not defined.\
Often used to verify that required specific variables have been defined.
Examples :
```velocity
#using( "var1" )
#using( "var1", "var2" )
#using( "var1", "var2", "foo", "bar" )
#using( '$var1' )
#using( '$var1', '$var2' )
```
# Telosys variables
Telosys provides a set of predefined variables which can be used in all template files.
## Standard variables
Standard variables have predefined names, their values are either set by Telosys or can be defined in the project configuration.
### Special characters
These variables are used to simplify the writing of templates when certain special characters are required and are difficult to mix with Velocity syntax.
These variables should be considered as "constants" and used as such.
| Variable name | Variable value |
| --------------------------------- | -------------- |
| **$DOLLAR** (dollar character) | **$** |
| **$SHARP** (sharp character) | **#** |
| **$AMP** (ampersand character) | **&** |
| **$QUOT** (double quotation mark) | **"** |
| **$LT** (less-than sign) | **<** |
| **$GT** (greater-than sign) | **>** |
| **$LBRACE** (left brace) | **{** |
| **$RBRACE** (right brace) | **}** |
| **$NEWLINE** (new line character) | **\n** |
| **$TAB** (tabulation character) | **\t** |
### Project configuration
These variables are specific for each project. They can be defined in the project configuration file ( "telosys-tools.cfg" )
All the project configuration variables are usable in both templates files (".vm" files) and bundle configuration file ("templates.cfg").
#### Directories
| Variable name | Configuration value |
| -------------- | ----------------------------------------------------------------------------------------------------- |
| **$SRC** |
Directory where to generate sources
e.g. "src/main/java", "src"
|
| **$RES** |
Directory where to generate resources
e.g. "src/main/resources", "conf"
|
| **$WEB** |
Directory where to generate web files
e.g. "src/main/webapp", "www"
|
| **$TEST\_SRC** |
Directory where to generate test sources
e.g. "src/test/java"
|
| **$TEST\_RES** |
Directory where to generate test resources
e.g. "src/test/resources"
|
| **$DOC** |
Directory where to generate documentation files e.g "doc"
|
| **$TMP** |
Directory where to generate temporary files
e.g. "tmp", "temp"
|
**Packages**
Variables usable for target languages having a notion of "packages" or "modules" or "namespaces" (Java, Golang, C#, etc)
| Variable name | Configuration value |
| ---------------- | -------------------------------------------------------------------- |
| **$ROOT\_PKG** |
The root package containing all other packages
|
| **$ENTITY\_PKG** |
The package containing the entities classes or structures
|
## Specific variables
If you need more variables for your project you can define them in the project configuration file "**telosys-tools.cfg**".
Once defined, these specific variables are usable exactly like standard variables.
You can use them in both templates files (".vm" files) and bundle configuration file ("templates.cfg").
See : [Configuration and variables](/project-configuration)
# Telosys objects
## Objects by categories
Telosys provides a set of predefined objects usable in the templates :
* Objects representing the model elements :
* [**$model**](https://www.telosys.org/doc/latest/objects/model.html) (current model)
* [**$entity**](https://www.telosys.org/doc/latest/objects/entity.html) (entity defined in the model) \[0:N entities in each model]
* [**$attribute**](https://www.telosys.org/doc/latest/objects/attribute.html) (attribute defined in an entity) \[1:N attributes in each entity]
* [**$fkPart** ](https://www.telosys.org/doc/latest/objects/fkPart.html) (part of foreign key, if attribute is involved in one or more FK)
* [**$link**](https://www.telosys.org/doc/latest/objects/link.html) (link defined in an entity) \[0:N links in each entity]
* [**$linkAttribute** ](https://www.telosys.org/doc/latest/objects/linkAttribute.html) (attribute involved in link definition) \[1:N / link]
* [**$fk** ](https://www.telosys.org/doc/latest/objects/fk.html)(foreign key defined in an entity) \[0:N FK in each entity]
* [**$fkAttribute** ](https://www.telosys.org/doc/latest/objects/fkAttribute.html) (attribute involved in FK definition) \[1:N / fk]
* [**$reference**](https://www.telosys.org/doc/latest/objects/reference.html) (reference to other entity) \[0:N references in each entity]
* Current environment and project :
* [**$env**](https://www.telosys.org/doc/latest/objects/env.html) (environment configuration)
* [**$project** ](https://www.telosys.org/doc/latest/objects/project.html) (project configuration)
* Generation in progress :
* [**$target** ](https://www.telosys.org/doc/latest/objects/target.html) (current target file being generated)
* [**$bundle**](https://www.telosys.org/doc/latest/objects/bundle.html) (bundle in use for current generation)
* [**$generator**](https://www.telosys.org/doc/latest/objects/generator.html) (generator engine)
* Utility functions and tools :
* [**$fn** ](https://www.telosys.org/doc/latest/objects/fn.html) (set of utility functions)
* [**$const** ](https://www.telosys.org/doc/latest/objects/const.html) (set of constants)
* [**$factory**](https://www.telosys.org/doc/latest/objects/factory.html) (a factory to create objects)
* [**$file** ](https://www.telosys.org/doc/latest/objects/file.html) (to use files located on the file system)
* [**$loader** ](https://www.telosys.org/doc/latest/objects/loader.html) (to load your own utility classes)
* [**$now** ](https://www.telosys.org/doc/latest/objects/now.html) (current date and time)
* [**$values** ](https://www.telosys.org/doc/latest/objects/values.html) (literal values generator for attributes)
* [**$h2** ](https://www.telosys.org/doc/latest/objects/h2.html) (utility functions for H2 database)
* Objects dedicated to code generation of certain target languages :
* Java : [**$java** ](https://www.telosys.org/doc/latest/objects/java.html) [**$jpa** ](https://www.telosys.org/doc/latest/objects/jpa.html) [**$jdbc**](https://www.telosys.org/doc/latest/objects/jdbc.html)
* C# : [**$csharp**](https://www.telosys.org/doc/latest/objects/csharp.html)
* PHP : [**$php** ](https://www.telosys.org/doc/latest/objects/php.html)
* SQL : [**$sql** ](https://www.telosys.org/doc/latest/objects/sql.html)
* HTML : [**$html** ](https://www.telosys.org/doc/latest/objects/html.html)
* Deprecated objects (do not use, just for backward compatibility) :
* ~~**$jdbcFactory**~~ (use **$factory** instead)
* ~~**$today**~~ (use **$now** instead)
* ~~**$beanValidation**~~ (all is now in **$java**)
## Objects reference documentation
The documentation reference for each object is available here :
* **Latest version** :
* [Telosys 4.3.0 - objects reference](https://www.telosys.org/doc/v430/objects/index.html)
* Previous version :
* [Telosys 4.1.0 - objects reference](https://www.telosys.org/doc/v410/objects/index.html)
* [Telosys 4.0.0 - objects reference](https://www.telosys.org/doc/v400/objects/index.html)
* [Telosys 3.3.0 - objects reference](https://www.telosys.org/doc/v330/objects/index.html)
# Code snippets
### Iterate over all entities defined in the model
```velocity
#foreach( $e in $model.allEntites )
...
#end
```
### Iterate over entity attributes
```velocity
#foreach( $attribute in $entity.attributes )
...
#end
#foreach( $attribute in $entity.keyAttributes)
...
#end
#foreach( $attribute in $entity.nonKeyAttributes)
...
#end
```
### Iterate over entity links
```velocity
#foreach( $link in $entity.links )
...
#end
```
### Execute a ".vm" file located in a model folder
The function "$fn.fileFromModel(fileName)" returns an instance of "file" located in the current model. If the file exists, its content is loaded and evaluated with "#evaluate" directive.
```velocity
#set( $file = $fn.fileFromModel("model-init.vm") )
#if($file.exists())#evaluate($file.loadContent())#end
```
### Get the class of an object
As all Velocity references ( "$xxx" ) are references of Java objects, sometimes it could be useful to know the object's class. To do this, just use "**class.name**" (full name with package) or "**class.simpleName**" (only the class name without package)
```velocity
#set( $v = 12 )
$v.class.name
$v.class.simpleName
#set( $s = "abc" )
$s.class.name
$s.class.simpleName
$entity.class.name
$now.class.simpleName
```
### Generate a file only once
Sometimes it can be useful to make sure you only generate a file once to avoid overwriting manual changes after project bootstrapping. Since Telosys 3.3.0 you can do that with **#cancel** directive.
```velocity
##--- NB : do not rewrite the file if it already exists
#if($target.outputFileExists() )#cancel("File already exists")#end
```
### Maps of lists
With Velocity, you can create a "map" of "anything". A map can contain any object, even lists.
```velocity
## --- Example 1 :
#set( $list1 = [ 0, 1, 2 ] )
#set( $list2 = [ "", "A", "B", "C", "D" ] )
## A map of lists :
#set( $m = {"k1" : $list1 , "k2" : $list2} )
## --- Example 2 (literal):
#set( $m2 = {
"int" : [ 100, 200, 300 ] ,
"str" : [ "AAA", "BB", "CCC", "D" ]
} )
## --- Usage
$m["k2"]
$m["k2"][2]
$m2["int"][1]
```
# Code generation
To generate your code you can use the following commands:
* **`gen`** to generate code with the current model and the current bundle\
see [gen command syntax](/code-generation/gen-command)
* **`genb`** to generate code in "batch mode" (since ver 4.1.0) with multiple models and/or bundles\
see [genb command syntax](/code-generation/genb-command)
# "gen" command
“**gen**” is the standard command commonly used to generate code in the scope of the **current model** and the **current bundle of templates**.
{% hint style="info" %}
You must have defined the **current model** and the **current bundle** \
before using the **gen** command.\
The Telosys prompt must look like this: `telosys#(model-name)[bundle-name]>`
{% endhint %}
## "gen" command syntax
```
> gen *|entities *|templates [-r] [-y]
```
* **`entities`** : a **list of entities** (part of the name) separated by a comma (,) or **"\*"** for all
* **`templates`** : a **list of templates** (part of the name) separated by a comma (,) or **"\*"** for all
* **`-r`** (optional) to copy the **static resources** provided by the bundle (if any)
* **`-y`** (optional) to force "**yes**" answer (to avoid confirmation)
## "gen" command examples
```
> gen * *
```
generates the code for **all the entities** of the current model with **all the templates** of the current bundle
```
> gen * * -r
```
generates the code for **all the entities** of the current model with **all the templates** of the current bundle and copy the **static resources** provided by the bundle (if any)
```
> gen Driver *
```
generates the code for only the entities having "**Driver**" in their name and for all the templates of the current bundle
```
> gen Car,Dri *
```
generates the code for only the entities having "**Car**" or "**Dri**" in their name and for all the templates of the current bundle
```
> gen * dao
```
generates the code for all the entities of the current model with only the templates having "**dao**" in their name
```
> gen Car,Dri dao,controller
```
generates the code for only the entities having "**Car**" or "**Dri**" in their name and only the templates having "**dao**" or "**controller**" in their name
# "genb" command
"**genb**" is a special command to generate code in "**batch mode**" (or "bulk mode") \
with **multiple models** and/or **multiple bundles**. \
This command has been added in Telosys version 4.1.0
Principle of using entities (.entity) and templates (.vm) for code generation:\
\- All entities present in the selected model(s) are used.\
\- All templates defined in the selected bundle(s) are used.
{% hint style="info" %}
You don't have to defined the **current model** and the **current bundle** \
before using the genb command (it can work with any models and any bundles)
{% endhint %}
## "genb" command syntax
```
> genb model(s) bundle(s) [-r] [-y]
```
* **`models`**: **model name** or **part of name** or **"\*"** for all models
* **`bundles`**: **bundle name** or **part of name** or **"\*"** for all bundles
* **`-r`** (optional) to copy the **static resources** provided by the bundle (if any)
* **`-y`** (optional) to force "**yes**" answer (to avoid confirmation)
## "genb" command examples
```
> genb * *
```
generates the code for **all the models** with **all the bundles of templates**
```
> genb cars java
```
generates the code for **all the models** having "***cars***" in their name \
with **all bundles** having "***java***" in their name
# Target languages
Telosys 4.0 predefined target languages
With Telosys you can generate any type of language by managing yourself all the target language specificities. But for the most common languages you can indicate the nature of your target language so as to simplify the writing of templates.
The target language can be specified in the template files (.vm) using the following directive :
```
#set( $env.language = 'LanguageName' )
```
Thus Telosys will be able to apply certain default behaviors, for example to convert the 'neutral type' of the model into a language-specific type or to determine literal values adapted to the language.
By default the target language is Java.
In the templates the target language has an influence on :
* $attribute.**type**
* $attribute.**fullType**
* $attribute.**simpleType**
* $attribute.**wrapperType**
* $attribute.**isPrimitiveType()**
All the pre-configured target languages currently supported by Telosys are defined below :
* [C++](/target-languages/cplusplus)
* [C#](/target-languages/csharp)
* [Golang](/target-languages/golang)
* [Java](/target-languages/java)
* [JavaScript](/target-languages/javascript)
* [Kotlin](/target-languages/kotlin)
* [PHP](/target-languages/php)
* [Python](/target-languages/python)
* [Scala](/target-languages/scala)
* [TypeScript](/target-languages/typescript)
For more detailed information, see the auto-generated documentation :
* **Latest version**
* [Telosys 4.3.0 - Target languages](https://www.telosys.org/doc/v430/languages/index.html)
* Previous versions :
* [Telosys 4.1.0 - Target languages](https://www.telosys.org/doc/v410/languages/)
* [Telosys 4.0.0 - Target languages](https://www.telosys.org/doc/v400/languages/index.html)
* [Telosys 3.3.0 - Target languages](https://www.telosys.org/doc/v330/languages/index.html)
# C++
**C++** language is supported since **version 3.3.0**
To define **C++** as the **target language** in a template file :
```
#set( $env.language = 'C++' )
```
\
The information below shows the behavior of the generator when C++ is the current target language. For a detailed description of type conversion, see the generated documentation :\
## Types conversion
The table below describes how model neutral types are automatically converted to C++ types with potential impact due to annotations (@UnsignedType, @NotNull, @PrimitiveType, @ObjectType)
Model type
C++ type
with annotation
string
std::string
byte
char
unsigned char
@UnsignedType
short
short
unsigned short
@UnsignedType
int
int
unsigned int
@UnsignedType
long
long
unsigned long
@UnsignedType
decimal
double
float
float
double
double
boolean
bool
date
std::chrono::year_month_day
time
std::chrono::hh_mm_ss
timetz
std::chrono::hh_mm_ss
datetime
std::chrono::local_time
datetimetz
std::chrono::zoned_time
timestamp
std::chrono::local_time
uuid
std::string
binary
std::vector
### Annotations effects
* **@UnsignedType** \
has effect only for **char**, **short**, **int**, **long**
* **@NotNull** \
has no effect
* **@PrimitiveType**\
no effect
* **@ObjectType** \
no effect
### Specific types
* **$attribute.fullType**\
no effect
* **$attribute.simpleType** \
no effect
* **$attribute.wrapperType** \
no effect
So, for **C++** you can always use the basic "**$attribute.type**"
## Literal values
#### TRUE, FALSE, NULL
| | C++ literal |
| ----- | ----------- |
| TRUE | **true** |
| FALSE | **false** |
| NULL | **NULL** |
### Generated literal values
Below some examples of literal values generated for each type :
| Model type | C++ type | C++ literal value |
| ---------- | --------------------------------- | ----------------------- |
| string | string | **"AAA"** |
| byte |
char
unsigned char
| **1** |
| short |
short
unsigned short
| **1** |
| int |
int
unsigned int
| **100** |
| long |
long
unsigned long
| **1000** |
| decimal | double | **10000.77** |
| float | float | **1000.5** |
| double | double | **1000.66** |
| boolean | bool | **true** or **false** |
| date | std::tm | **NULL** |
| time | | **NULL** |
| timestamp | | **NULL** |
| binary | | **NULL** |
# C\#
To define **C#** as the **target language** in a template file :
```
#set( $env.language = 'C#' )
```
A "**?**" is automatically added to the end of the type if the attribute is "**nullable**" (no "@NotNull" annotation). To disable this behavior:
```
#set( $env.typeWithNullableMark = false )
```
The information below shows the behavior of the generator when C# is the current target language. For a detailed description of type conversion, see the generated documentation : \
## Types conversion
The table below describes how model neutral types are automatically converted to C# types with potential impact due to attribute annotations.
| Model type | C# type | with annotation |
| ------------- | --------------------------------------------------------------------------------------------------------------------- | --------------------------------------------------------- |
| string |
string? string String?
|
@NotNull
@ObjectType
|
| byte |
sbyte? sbyte byte? SByte?
|
@NotNull
@UnsignedType @ObjectType
|
| short |
short?
short ushort? Int16?
|
@NotNull
@UnsignedType
@ObjectType
|
| int |
int?
int uint? Int32?
|
@NotNull
@UnsignedType
@ObjectType
|
| long |
long?
long
ulong?
Int64?
|
@NotNull
@UnsignedType
@ObjectType
|
| decimal |
decimal?
decimal
Decimal?
|
@NotNull
@ObjectType
|
| float |
float?
float Single?
|
@NotNull
@ObjectType
|
| double |
double?
double Double?
|
@NotNull
@ObjectType
|
| boolean |
bool?
bool Boolean?
|
@NotNull
@ObjectType
|
| date |
DateOnly? DateOnly
|
@NotNull
|
| time |
TimeOnly? TimeOnly
|
@NotNull
|
| timetz |
TimeOnly? TimeOnly
|
@NotNull
|
| datetime |
DateTime? DateTime
|
@NotNull
|
| datetimetz |
DateTimeOffset? DateTimeOffset
|
@NotNull
|
| ~~timestamp~~ |
DateTime? DateTime
|
@NotNull
|
| uuid |
Guid? Guid
|
@NotNull
|
| binary |
byte\[]? byte \[ ]
|
@NotNull
|
Remarks:
* since ver 4.1.0 "date" is converted to "DateOnly" and "time" is converted to "TimeOnly"
### Annotations effects
* **@UnsignedType** \
has effect only for **byte**, **short**, **int**, **long**
* **@ObjectType** \
switches to **.Net types** ( System.Int64, System.Boolean, etc)
* **@NotNull** \
type not nullable => no "?" at the end of the type
* **@PrimitiveType** \
no effect
### Specific types
* **$attribute.fullType**\
returns the C# System class full name for both "primitive type" and "object type"\
( for example : System.String, System.Int16, System.Decimal )
* **$attribute.simpleType**
* for an "object type" returns the simple type name of the C# System class ( for example : String, Int16, Decimal )
* for a "standard type" returns the usual type\
( for example : string, int, uint, bool )
* **$attribute.wrapperType** \
returns the C# System class associtated with the curren type
## Literal values
#### TRUE, FALSE, NULL
| | C# literal |
| ----- | ---------- |
| TRUE | **true** |
| FALSE | **false** |
| NULL | **null** |
### Generated literal values
Below some examples of literal values generated for each type :
| Model type | C# type | C# literal value |
| ---------- | -------------------------------------------- | ----------------------- |
| string |
string
System.String
| **"AAA"** |
| byte |
sbyte
byte
System.SByte
| **1** |
| short |
short ushort System.Int16
| **1** |
| int |
int uint System.Int32
| **100** |
| long |
long
ulong
System.Int64
| **1000L** |
| decimal |
decimal System.Decimal
| **10000.77M** |
| float |
float System.Single
| **1000.5F** |
| double |
double System.Double
| **1000.66D** |
| boolean |
bool System.Boolean
| **true** or **false** |
| date | System.DateOnly | **null** |
| time | System.TimeOnly | **null** |
| timestamp | System.DateTime | **null** |
| binary | byte \[ ] | **null** |
# Golang
To define **Golang** as the **target language** in a template file :
```
#set( $env.language = 'Go' )
```
The information below shows the behavior of the generator when Golang is the current target language. For a detailed description of type conversion, see the generated documentation : \
## Types conversion
The table below describes how model neutral types are automatically converted to Golang types with potential impact due to attribute annotations.
| Model type | Go type | with annotation |
| ------------- | --------------------------------------------------------- | ---------------------------- |
| string | **string** | |
| byte |
byte uint8
|
@UnsignedType
|
| short |
int16 uint16
|
@UnsignedType
|
| int |
int32 uint32
|
@UnsignedType
|
| long |
int64 uint64
|
@UnsignedType
|
| decimal | **float64** | |
| float | **float32** | |
| double | **float64** | |
| boolean | **bool** | |
| date | **time.Time** | |
| time | **time.Time** | |
| timetz | **time.Time** | |
| datetime | **time.Time** | |
| datetimetz | **time.Time** | |
| ~~timestamp~~ | **time.Time** | |
| uuid | **uuid.UUID** | |
| binary | **\[ ] byte** | |
### Annotations effects
* **@UnsignedType** \
has effect only for **byte**, **short**, **int**, **long**
* **@ObjectType** \
no effect
* **@NotNull** \
no effect
* **@PrimitiveType** \
no effect
### Specific types
* **$attribute.fullType**\
no effect (always returns the standard Go type)
* **$attribute.simpleType**
no effect (always returns the standard Go type)
* **$attribute.wrapperType** \
no effect (always returns the standard Go type)
So, for **Golang** you can always use the basic "**$attribute.type**"
### See also
For more information about Golang types see :
*
## Literal values
#### TRUE, FALSE, NULL
| | Golang literal |
| ----- | -------------- |
| TRUE | **true** |
| FALSE | **false** |
| NULL | **nil** |
### Generated literal values
Below some examples of literal values generated for each type :
| Model type | Golang type | Golang literal value |
| ---------- | ----------------------- | ----------------------- |
| string | string | **"AAA"** |
| byte |
byte
uint8
| **1** |
| short |
int16 uint16
| **1** |
| int |
int32 uint32
| **100** |
| long |
int64 uint64
| **1000** |
| decimal | float64 | **10000.77** |
| float | float32 | **1000.5** |
| double | float64 | **1000.66** |
| boolean | bool | **true** or **false** |
| date | time.Time | **nil** |
| time | time.Time | **nil** |
| timestamp | time.Time | **nil** |
| binary | \[ ] byte | **nil** |
# Java
**Java** is the target language **by default**, so you don't have to define it explicitly.
However, you can define it with the following instruction :
```
#set( $env.language = 'Java' )
```
The information below shows the behavior of the generator when Java is the current target language. For a detailed description of type conversion, see the generated documentation : \
## Types conversion
The table below describes how model neutral types are automatically converted to Java types with potential impact due to attribute annotations.
| Model type | Java type | with annotation |
| ------------- | --------------------------------------------------------------------------------------------- | ---------------------------------------- |
| string | **String** | |
| byte |
Byte byte byte
|
@NotNull @PrimitiveType
|
| short |
Short
short
short
|
@NotNull @PrimitiveType
|
| int |
Integer int
int
|
@NotNull @PrimitiveType
|
| long |
Long
long
long
|
@NotNull @PrimitiveType
|
| decimal | **BigDecimal** | |
| float |
Float
float
float
|
@NotNull @PrimitiveType
|
| double |
Double
double
double
|
@NotNull @PrimitiveType
|
| boolean |
Boolean
boolean
boolean
|
@NotNull @PrimitiveType
|
| date | **LocalDate** | |
| time | **LocalTime** | |
| timetz | **OffsetTime** | |
| datetime | **LocalDateTime** | |
| datetimetz | **OffsetDateTime** | |
| ~~timestamp~~ | **LocalDateTime** | |
| uuid | **UUID** | |
| binary | **byte \[ ]** | |
### Annotations effects
* **@UnsignedType** \
no effect (all numeric types are signed in Java)
* **@ObjectType** \
switches to the standard wrapper type for the current type \
(Byte, Short, Integer, Long, Float, Double, Boolean)
* **@PrimitiveType** \
switches to the primitive type if possible\
(byte, short, int, long, float, double, boolean)
* **@NotNull** \
switches to primitive type if possible in order to avoid 'null' value
### Specific types
* **$attribute.fullType**
* for an "object type" returns the fully-qualified class name \
(java.lang.String, java.lang.Integer, java.math.BigDecimal, etc )
* for a "primitive type" returns the primitive type as is
( int, double, etc )
* **$attribute.simpleType**
* for an "object type" returns the simple class name\
( String, Integer, Double, etc )
* for a "primitive type" returns the primitive type as is
( int, double, etc )
* **$attribute.wrapperType** \
returns the Java wrapper type class associtated with the current type (Integer, Double, etc )
## Literal values
#### TRUE, FALSE, NULL
| | Java literal |
| ----- | ------------- |
| TRUE | **true** |
| FALSE | **false** |
| NULL | **null** |
# JavaScript
To define **JavaScript** as the **target language** in a template file :
```
#set( $env.language = 'JavaScript' )
```
JavaScript is a dynamically-typed language, with **no type** in the source code. \
Therefore, the type conversion always return a void string.
For a detailed description with literal values examples, see the generated documentation : \
Only literal values are affected by the current target language.
| | Javascript literal |
| ----- | ------------------- |
| TRUE | **true** |
| FALSE | **false** |
| NULL | **null** |
# Kotlin
Kotlin is a predefined target language since Telosys **version 4.1.0**
To define **Kotlin** as the **target language** in a template file :
```
#set( $env.language = 'Kotlin' )
```
A "**?**" is automatically added to the end of the type if the attribute is "**nullable**" (no "@NotNull" annotation). To disable this behavior:
```
#set( $env.typeWithNullableMark = false )
```
The information below shows the behavior of the generator when Kotlin is the current target language. For a detailed description of type conversion, see the generated documentation : \
## Types conversion
The table below describes how model **neutral types** are automatically converted to **Kotlin types** with potential impact due to attribute annotations.
The table below describes how model neutral types are automatically converted to C# types with potential impact due to attribute annotations.
| Model type | Kotlin type | with annotation |
| ------------- | ------------------------------------------------------------------------------------ | ------------------------------------------ |
| string |
String? String
|
@NotNull
|
| byte |
Byte? UByte? Byte
|
@UnsignedType @NotNull
|
| short |
Short? UShort? Short
|
@UnsignedType @NotNull
|
| int |
Int? UInt? Int
|
@UnsignedType @NotNull
|
| long |
Long? ULong? Long
|
@UnsignedType
@NotNull
|
| decimal |
BigDecimal? BigDecimal
|
@NotNull
|
| float |
Float? Float
|
@NotNull
|
| double |
Double? Double
|
@NotNull
|
| boolean |
Boolean? Boolean
|
@NotNull
|
| date |
LocalDate?
LocalDate
|
@NotNull
|
| time |
LocalTime?
LocalTime
|
@NotNull
|
| timetz |
OffsetTime? OffsetTime
|
@NotNull
|
| datetime |
LocalDateTime? LocalDateTime
|
@NotNull
|
| datetimetz |
OffsetDateTime? OffsetDateTime
|
@NotNull
|
| ~~timestamp~~ |
LocalDateTime? LocalDateTime
|
@NotNull
|
| uuid |
UUID? UUID
|
@NotNull
|
| binary |
ByteArray? ByteArray
|
@NotNull
|
### Annotations effects
* **@UnsignedType** \
has effect only for **byte**, **short**, **int**, **long**
* **@ObjectType** \
no effect
* **@NotNull** \
type not nullable => no "?" at the end of the type
* **@PrimitiveType** \
no effect
## Literal values
#### TRUE, FALSE, NULL
| | Kotlin literal |
| ----- | -------------- |
| TRUE | **true** |
| FALSE | **false** |
| NULL | **null** |
# PHP
To define **PHP** as the **target language** in a template file :
```
#set( $env.language = 'PHP' )
```
A "**?**" is automatically added at the beginning of the type if the attribute is "**nullable**" (no "@NotNull" annotation). To disable this behavior:
```
#set( $env.typeWithNullableMark = false )
```
The information below shows the behavior of the generator when PHP is the current target language. For a detailed description of type conversion, see the generated documentation : \
## Types conversion
\
Typed class properties were added in PHP 7.4 ( )
So since Telosys version 4.1.0, type conversion was added for the PHP language.
| Model type | PHP property type | with annotation |
| ------------- | --------------------------------------------------------------- | ---------------------- |
| string |
?string
string
|
@NotNull
|
| byte |
?int int
|
@NotNull
|
| short |
?int int
|
@NotNull
|
| int |
?int int
|
@NotNull
|
| long |
?int int
|
@NotNull
|
| decimal |
?float float
|
@NotNull
|
| float |
?float float
|
@NotNull
|
| double |
?float float
|
@NotNull
|
| boolean |
?bool bool
|
@NotNull
|
| date |
?DateTime DateTime
|
@NotNull
|
| time |
?DateTime DateTime
|
@NotNull
|
| timetz |
?DateTime DateTime
|
@NotNull
|
| datetime |
?DateTime DateTime
|
@NotNull
|
| datetimetz |
?DateTime DateTime
|
@NotNull
|
| ~~timestamp~~ |
?DateTime DateTime
|
@NotNull
|
| uuid |
?string
string
|
@NotNull
|
| binary |
?string
string
|
@NotNull
|
## Literal values
#### TRUE, FALSE, NULL
| | PHP literal |
| ----- | ------------ |
| TRUE | **true** |
| FALSE | **false** |
| NULL | **null** |
# Python
To define **Python** as the **target language** in a template file :
```
#set( $env.language = 'Python' )
```
The information below shows the behavior of the generator when Python is the current target language.
For a detailed description of type conversion and literal values see the generated documentation : \
## Types conversion
Python is a dynamically-typed language, so there are no real types in the source code. \
But "**type hints**" were introduced in PEP 484 to make Python code easier to understand, maintain, and analyze. Telosys offers an automatic conversion of the model's neutral types into Python type hints.
The table below describes how model neutral types are automatically converted to Python type hints.
Conversion to Python type hints is supported since Telosys 4.3.0
| Model type | Python type hint |
| ----------- | ---------------- |
| string | **str** |
| byte | **int** |
| short | **int** |
| int | **int** |
| long | **int** |
| decimal | **Decimal** |
| float | **float** |
| double | **float** |
| boolean | **bool** |
| date | **date** |
| time | **time** |
| timetz | **time** |
| datetime | **datetime** |
| *timestamp* | **datetime** |
| datetimetz | **datetime** |
| uuid | **UUID** |
| binary | **bytes** |
### Annotations effects
* **@UnsignedType** : no effect
* **@ObjectType** : no effect
* **@NotNull** : no effect
* **@PrimitiveType** : no effect
## Literal values
#### TRUE, FALSE, NULL
| | Python literal |
| ----- | -------------- |
| TRUE | **True** |
| FALSE | **False** |
| NULL | **none** |
# Scala
**Scala** is supported since **version 3.3.0**
To define **Scala** as the **target language** in a template file :
```
#set( $env.language = 'Scala' )
```
The information below shows the behavior of the generator when Scala is the current target language.
For a detailed description of type conversion and literal values see the generated documentation: \
## Types conversion
The table below describes how model neutral types are automatically converted to Scala types with potential impact due to attribute annotations.
| Model type | Scala type | |
| ------------- | ------------------ | - |
| string | **String** | |
| byte | **Byte** | |
| short | **Short** | |
| int | **Int** | |
| long | **Long** | |
| decimal | **BigDecimal** | |
| float | **Float** | |
| double | **Double** | |
| boolean | **Boolean** | |
| date | **LocalDate** | |
| time | **LocalTime** | |
| timetz | **OffsetTime** | |
| datetime | **LocalDateTime** | |
| datetimetz | **OffsetDateTime** | |
| ~~timestamp~~ | **LocalDateTime** | |
| uuid | **UUID** | |
| binary | **Array\[Byte]** | |
### Annotations effects
* **@UnsignedType** : no effect
* **@ObjectType** : no effect
* **@NotNull** : no effect
* **@PrimitiveType** : no effect
## Literal values
#### TRUE, FALSE, NULL
| | Scala literal |
| ----- | ------------- |
| TRUE | **true** |
| FALSE | **false** |
| NULL | **null** |
# TypeScript
To define **TypeScript** as the **target language** in a template file :
```
#set( $env.language = 'TypeScript' )
```
The information below shows the behavior of the generator when TypeScript is the current target language.
For a detailed description of type conversion and literal values see the generated documentation:[
](<
https://www.telosys.org/doc/latest/languages/language-scala.html>)\
## Types conversion
The table below describes how **model neutral types** are automatically converted to **TypeScript types**
| Model type | TypeScript type | |
| ------------- | --------------- | - |
| string | **string** | |
| byte | **number** | |
| short | **number** | |
| int | **number** | |
| long | **number** | |
| decimal | **number** | |
| float | **number** | |
| double | **number** | |
| boolean | **boolean** | |
| date | **Date** | |
| time | **Date** | |
| timetz | **Date** | |
| datetime | **Date** | |
| datetimetz | **Date** | |
| ~~timestamp~~ | **Date** | |
| uuid | **string** | |
| binary | **Uint8Array** | |
### Annotations effects
* **@UnsignedType** : no effect
* **@ObjectType** : no effect
* **@NotNull** : no effect
* **@PrimitiveType** : no effect
### See also
For more information about TypeScript see :
*
## Literal values
#### TRUE, FALSE, NULL
| | TypeScript literal |
| ----- | ------------------- |
| TRUE | **true** |
| FALSE | **false** |
| NULL | **null** |
# Target SQL scripts
With Telosys you can generate SQL scripts to manage your database (create table, drop table, foreign key definition, etc).
As SQL statements may differ depending on the type of database you are targeting, Telosys has a configuration system that allows the generated SQL to be adapted to the target database.
This can be done in 2 ways:
* using [**predefined rules**](/target-sql-scripts/predefined-rules)
* using [**specific rules**](/target-sql-scripts/specific-rules)
### Database customization behavior
If **no rules** have been defined (neither predefined nor specific), then the "**ANSI-SQL**" will be used by default.
If you have defined both predefined rules and specific rules, the specific rules will apply (the more specific takes precedence).
Whatever your rules definition, if an entity or an attribute has database annotations in the model (@DbName, @DbType, @DbTable, etc) those annotations will be used first.
In the templates the database configuration has an influence on:
* $entity.sqlTableName
* $entity.sqlPrimaryKeyColumns
* $entity.sqlPrimaryKeyColumnsAsString
* $attribute.sqlColumnName
* $attribute.sqlColumnType
* $attribute.sqlColumnConstraints
* $fk.sqlName
* $fk.sqlOriginTableName
* $fk.sqlOriginColumns
* $fk.sqlOriginColumnsAsString
* $fk.sqlReferencedTableName
* $fk.sqlReferencedColumns
* $fk.sqlReferencedColumnsAsString
* $sql object
# Predefined rules
Telosys provides predefined rules to generate SQL for the most common databases.
To use them, simply indicate the database type in the template file (.vm).
The target database can be specified using the following directive :
```
#set ( $env.database = 'databaseType' )
```
Since version 4.0 Telosys has the following predefined database types:
* **POSTGRESQL**
* **MYSQL**
* **ORACLE**
* **SQLSERVER**
* **ANSISQL** (for standard ANSI-SQL )
The predefined database types are not case sensitive.
Examples:
```
#set ( $env.database = 'postgresql' )
#set ( $env.database = 'PostgreSQL' )
#set ( $env.database = 'POSTGRESQL' )
```
If you try to use an unknown database name, an error will occur.
# Specific rules
If your database is not part of the predefined databases, or if the generated SQL does not match your needs, you can define your own SQL generation rules.
To do this, you just need to create a **file** containing the **conversion rules**.
The rules file can be specified in the template files (.vm) using the following directive:
```
#set ( $env.databaseConvFile = $myOwnFile )
```
Examples:
```
#set ( $env.databaseConvFile = $fn.fileFromBundle('mydb.properties') )
#set ( $env.databaseConvFile = $fn.fileFromModel('mydb.properties') )
```
### Defining specific conversion rules in a file
A specific rules file is a text file (properties file) containing 2 parts:
* Naming conventions (prefix "conv.")
* Type conversion (prefix "type.")
**1) Naming conventions:**
You can set the naming convention to be applied for **tables**, **columns**, **primary keys** and **foreign keys**.
There are 4 naming standards (choose one of these):
* **camelCase**
* **PascalCase**
* **snake\_case**
* **ANACONDA\_CASE**
Examples:
```
conv.tableName = ANACONDA_CASE
conv.columnName = snake_case
conv.pkName = PascalCase
conv.fkName = camelCase
```
**2) Type conversion:**
This part defines how to convert a **neutral type** (Telosys model type) to an **SQL type** (in the database).
Syntax:
* Left side:\
the **neutral type** with "type." prefix and optionally the ".autoincr" suffix \
if used for autoincremented attribute
* Right side:\
any string to be used as the **SQL type** for this neutral type\
with placeholders for "**size**" and "**precision**":
* "**(%s)**" : size (optional)
* "**(%S)**" : size mandatory
* "**(%p)**" : precision (optional)
* "**(%P)**" : precision mandatory
See [type size and precision](/target-sql-scripts/type-size-and-precision) for more information
Examples:
```
type.string = VARCHAR(%s)
type.string = VARCHAR2(%s)
type.byte = smallint
type.byte.autoincr = smallserial
type.short = smallint
type.short.autoincr = smallserial
type.int = integer
type.int.autoincr = serial
type.long = bigint
type.long.autoincr = bigserial
type.decimal = numeric(%p)
type.decimal = numeric(%P)
type.float = real
type.double = double precision
type.boolean = boolean
type.boolean = CHAR(1)
type.date = date
type.time = time
type.time = time with time zone
type.timestamp = timestamp
type.timestamp = timestamp with time zone
type.binary = bytea
```
# Type size and precision
### Type size
The "**size**" is often required for SQL types like:
* CHAR(size)
* VARCHAR(size)
* VARCHAR2(size)
* NVARCHAR(size)
* BINARY(size)
* VARBINARY(size)
This is how the size value is determined:
1. if the attribute has a "**@DbType**" annotation this database type will be used "as is"\
regardless of the target database\
Example:\
`name : string {`` `**`@DbType('VARCHAR(20)')`**` ``}`\
the SQL type will be **`VARCHAR(20)`**
2. else if the attribute has a "**@Size**" annotation this value will be used \
Example: \
`name : string {`` `**`@Size(20)`**`}`\
the SQL type will be \
\- **`VARCHAR(20)`** for PostgreSQL \
\- **`VARCHAR2(20)`** for Oracle
3. else if the attribute has a "**@MaxLen**" annotation this value will be used \
Example:\
`name : string {`` `**`@MaxLen(12)`**`}`\
the SQL type will be \
\- **`VARCHAR(12)`** for PostgreSQL \
\- **`VARCHAR2(12)`** for Oracle
4. else if the size is not mandatory ("%s") for the SQL type\
then the type is generated without size, for example:\
\- **`VARCHAR`** for PostgreSQL
5. else size is mandatory ("%S") and cannot be determined:\
an error is thrown
Reminder: "*@DbSize(xx)*" annotation is deprecated (do not use it)
### Type precision
The "**precision**" is often required (or indispensable) for SQL types like:
* NUMERIC(precision)
* NUMBER(precision)
* DECIMAL(precision)
* FLOAT(precision)
The "**precision**" defines the number of digits for a decimal type, \
it can contains a "**scale**" (number of digits after the decimal).
Examples:
* "10" : precision = 10 digits
* "8,2" : precision = 8 digits with 2 digits after the decimal (scale = 2)
This is how the precision value is determined:
1. if the attribute has a "**@DbType**" annotation this database type will be used "as is"\
regardless of the target database\
Example:\
`weight : decimal {`` `**`@DbType('DECIMAL(5,2)')`**` ``}`\
the SQL type will be **`DECIMAL(5,2)`**
2. else if the attribute has a "**@Size**" annotation this value will be used \
Example: \
`weight: decimal {`` `**`@Size(8,5)`**` ``}`\
the SQL type will be \
\- **numeric(8,5)** for PostgreSQL \
\- **NUMBER(8,5)** for Oracle
3. else if the attribute has a "**@MaxLen**" annotation this value will be used \
Example:\
`weight : decimal {`` `**`@MaxLen(12)`**` ``}`\
the SQL type will be \
\- **`numeric(12)`** for PostgreSQL \
\- **`NUMBER(12)`** for Oracle
4. else if the precision is not mandatory ("%p") for the SQL type\
then the type is generated without precision, for example:\
\- **`numeric`** for PostgreSQL \
\- **`NUMBER` ** for Oracle
5. else precision is mandatory ("%P") and cannot be determined:\
an error is thrown
Reminder: "*@DbSize(xx)*" annotation is deprecated (do not use it)
# Git with Telosys
You can use **Git** to manage your **models** and **bundles** of templates.
By default, Telosys uses **GitHub** to provide templates and bundles that can be installed with "**im**" and "**ib**" commands.
For GitHub depots and personal acces token see [GitHub usage](/git-with-telosys/github-usage).
You can use Git repositories on your workstation to manage your templates and bundles.
You can do this using:
* your preferred **Git tools** (Git-CLI, Git-Bash, etc) - see [Git as an external tool](/git-with-telosys/git-as-an-external-tool)
* **Telosys' built-in Git commands** (since version 4.3.0) - see [Git embedded in Telosys](/git-with-telosys/git-embedded-in-telosys)
# GitHub usage
## GitHub depot configuration
It's possible to define 3 types of depot:
* a GitHub organization: \
**`github_org`** + "**`:`** " + ***`organization-name`***
* a GitHub user: \
**`github_user`** + " **`:`**" + ***`user-name`***
* the GitHub current user (authenticated by the current personal acces token): \
**`github_current_user`**
To define your own depots on GitHub see "[Project configuration](/project-configuration)".
## GitHub Personal Access Token
Telosys uses the GitHub REST API ( ) to get the models and bundles available for installation.
This API has “**rate limits**” which can be reached quite quickly if several users share the same external IP address (which is usually the case with a corporate proxy).
To get around this limitation, you can use a "**GitHub Personal Access Token**" (PAT).
With a "Personal Acces Token" the **limit** increased from 50 to **5000 requests** for each user with a token.
Since version 4.2.0 you can use the command "**ght**" ("GitHub Token") to define (or remove) a "Personal Acces Token" that Telosys will use to call the GitHub API.
Using a Personal Access Token can also give you access to private repositories (depending on your rights).
**Step 1 - Define your Personal Acces Token in GitHub**
See GitHub documentation : "[Managing your personal access tokens](https://docs.github.com/en/authentication/keeping-your-account-and-data-secure/managing-your-personal-access-tokens)"
Creating a personal access token (classic) is sufficient.
Copy the token so that you can use it with Telosys later.
**Step 2 - Use your Personal Acces Token with Telosys**
Once you have your token, you can use the “**ght**” command to store it on your workstation. \
The token is encrypted and stored locally, so it can be used for all Telosys projects on a workstation.
* Check if the token is defined : **`ght`**
* Define a token: **`ght -set`** ⇒ Copy/Paste your token
* Remove the token: **`ght -none`**
# Git embedded in Telosys
Since version 4.3.0 Telosys-CLI is able to execute Git commands by itself, \
even if no Git tool is intalled on your workstation.
**Git is embedded in Telosys-CLI** in order to simplify Git usage to **clone**, **init** and **publish** models and bundles repositories.
**`git`** is the command to execute git operations.
For help with Git commands, type **`? git`** in Telosys-CLI .
All git commands are designed to work with **Telosys models and bundles**:
* Commands ending with "**m**" are for **models**
* Commands ending with "**b**" are for **bundles**
{% hint style="info" %}
The **remote repository** is defined from the current "**depot**" configuration.\
To define a specific depot for models or bundles, see [Project configuration](/project-configuration)
{% endhint %}
### Clone an existing Git repository
This command allows to clone a repository from the current "depot" or from a specific URL.
**Clone a model repository with "****clonem****"**
**🔹 `git clonem`` `*****`model-name-in-depot`***` ``|or|`` `***`any-repo-url`***
* Examples:
* clone by name:\
`git clonem cars`
* clone by URL:\
`git clonem https://github.com/telosys-models-v4-3/employees`
**Clone a bundle repository with "****cloneb****"**
**🔹 `git cloneb`` `*****`bundle-name-in-depot`***` ``|or|`` `***`any-repo-url`***
* Examples:
* clone by name:\
`git cloneb front-angular`
* clone by URL:\
`git cloneb https://github.com/telosys-templates-v4-3/java-jpa-entities`
### Init a new Git repository
After installing or creating a new model or bundle you can create the Git repository with "initm" or "initb".
**Init a model repository with "****initm****"**
**🔹 `git initm`` `*****`[model-name]`***
* Examples:
* init the current model (without parameter)\
`git initm`
* init a specific model\
`git initm pizzas`
**Init a bundle repository with "****initb****"**
**🔹 `git initb`` `*****`[bundle-name]`***
* Examples:
* init the current bundle (without parameter)\
`git initb`
* init a specific bundle\
`git initb database-sql-liquibase`
### Check current status
**Check a model repository status with "****statusm****"**
**🔹 `git statusm`` `*****`[model-name]`***
* Examples:
* get the status of the current model (without parameter)\
`git statusm`
* get the status of a specific model\
`git statusm cars`
**Check a bundle repository status with "****statusb****"**
**🔹 `git statusb`` `*****`[bundle-name]`***
* Examples:
* get the status of the current bundle (without parameter)\
`git statusb`
* get the status of a specific bundle \
`git statusb front-angular`
### Publish all changes to remote repository
The "**pub\[m/b]**" command allow to perform several "Git" actions with a single command:
* **git add** \
Adds all the changes to the index
* **git commit** \
Creates a new commit containing the current contents of the index\
It uses a default message
* **git push** \
Pushes to the remote repository according with the current "depot" definition
With this command you just have to:
* edit the model or the bundle
* use "git pub\[m/b]" to publish it on the remote server
{% hint style="info" %}
Before using the "git pub\[m/b]" command, ensure that the remote repository exists in the "depot".\
If the remote Git repository does not yet exist, create it.\
You can do that with the web GUI on GitHub, GitLab, your own server, etc...
{% endhint %}
**Publish a model repository status with "****pubm****"**
**🔹 `git pubm`` `*****`[model-name]`***
* Examples:
* publish the current model (without parameter)\
`git pubm`
* publish a specific model\
`git pubm pizzas`
**Publish a bundle repository status with "****pubb****"**
**🔹 `git pubb`` `*****`[bundle-name]`***
* Examples:
* publish the current bundle (without parameter)\
`git pubb`
* publish a specific bundle\
`git pubb database-sql-liquibase`
### Reset from remote repository
The "**reset\[m/b]**" command allows to perform 2 "Git" actions with a single command:
* **git fetch**\
Fetch the branch from the remote repository
* **git reset --mixed** \
Resets the index but **not the working tree** (changed files are preserved but not marked for commit)
In brief: make the branch match remote, keep changes unstaged, forget old commits.\
This command is useful in case of "**REJECTED\_NONFASTFORWARD**" error \
when attempting to push the changes to a remote server with "**git pub\[m/b]**" command.
**Reset a model repository with "****resetm****"**
**🔹 `git resetm`` `*****`[model-name]`***
* Examples:
* reset the current model (without parameter)\
`git resetm`
* reset a specific model\
`git resetm cars`
**Reset a bundle repository with "****resetb****"**
**🔹 `git resetb`` `*****`[bundle-name]`***
* Examples:
* reset the current bundle (without parameter)\
`git resetb`
* reset a specific bundle \
`git resetb front-angular`
### Git credentials management
Credentials are required for Git remote repository operations, \
the "**git cred**" commands allows to print, set and remove credentials.
You can define credentials at different levels:
* "**global credentials**" used for both models and bundles (the most frequent case)
* "**model credentials**" used only for models
* "**bundle credentials**" used only for bundles
{% hint style="info" %}
The credentials are encrypted and stored on the workstation.\
They can be used by all telosys projects.
{% endhint %}
To show all credentials settings (password or token are not printed, just "set" or "not set"):
**🔹 `git cred`** show **all** credentials (all levels)
**🔹 `git credg`** show the "**global**" credentials (for both models and bundles)
**🔹 `git credm`** show the credentials for "**models**"
**🔹 `git credb`** show the credentials for "**bundles**"
To set the credentials use **`-set`** parameter \
and enter the requested information:
* User name
* Password or personal access token (PAT)
To remove the credentials use **`-none`** parameter
# Git as an external tool
Prior to version 4.3.0, the only way to manage Git repositories was to use a Git tool external to Telosys.
Below you will find the git commands useful for this.
{% hint style="info" %}
All the following **git command** examples are meant to be used with a standard **operating-system shell** \
(not in Telosys-CLI )
{% endhint %}
### Check and configure Git
Verify that the Git command is available.\
`$`` `**`git --version`**
Verify your user name and email at global level \
`$`` `**`git config --global -l`**
Define your user name and email at global level (if necessary)\
`$`` `**`git config --global user.name "Your Name"`**\
`$`` `**`git config --global user.email your@email.com`**
### Clone an existing Git repository
If you plan to customize an existing model or bundle of templates, it may be more efficient to clone the Git repository so that you can then publish the changes more easily.
You can install a model or a bundle from any Git repository just using Git commands.
* On the Git server (GitHub, GitLab, your own server, etc) \
get the **Git URL** for the repository to install (on your remote Git server). \
For example: **`http://server-name/xxx/yyy/repo-name.git`**
* Go into the models or bundles directory\
`$`**`cd TelosysTools\models`** \
or `$`**`cd TelosysTools\templates`**
* Clone the Git repository in the models or bundles directory\
`$`**`git clone http://server-name/xxx/yyy/repo-name.git`**
After a "git clone" the model or bundle is installed and ready to use.\
It works as a standard model/bundle, but it has Git repository, so it is ready for "commit" and "push" to publish your changes.
### Init a new Git repository
After installing or creating a model or bundle you must create its Git repository.
* Go into the model or bundle directory\
`$`**`cd TelosysTools\models\mymodel`** \
or `$`**`cd TelosysTools\templates\mybundle`**
* Init the new Git repository\
`$`**`git init -b master`**
### Commit your changes
Preliminary note: \
if you want to define a specific user name and email for the **current repository** \
`$`` `**`git config --local user.name "Your Name"`**\
`$`` `**`git config --local user.email your@email.com`**
🔹Add all the files to be committed (usually all files)\
`$`**`git add .`**
🔹Commit the files \
`$`**`git commit -m "My commit message"`**
### Check the remote repository
If the remote Git repository does not yet exist, create it.\
You can do that with the web GUI on GitHub, GitLab, your own server, etc...
Check and configure the Git remote repository:
🔹Check Git remote\
`$`**`git remote -v`**\
`origin https://xxx/yyy/repo-name.git (fetch)`\
`origin https://xxx/yyy/repo-name.git (push)`
🔹Add the remote repository if necessary \
`$`**`git remote add origin https://xxx/yyy/repo-name.git`** \
(you can copy/paste the repository URL)
### Push to the remote repository
Push to “origin” (remote-side) a branch of your repository (for example “master”)\
`$`**`git push origin master`**\
(if not authenticated Git ask for user & password)
# Support the project
This project took a lot of time and energy, so if you like Telosys you can support us a bit to encourage us to keep improving it.
You can help Telosys in different ways ...
### Take a few seconds to ad**d a star**:star:
* on [**GitHub / Telosys-CLI**](https://github.com/telosys-tools-bricks/telosys-cli)
* on [**GitHub / Telosys Eclipse plugin**](https://github.com/telosys-eclipse-v3/TelosysToolsPlugin)
* on [**Visual Studio Code Marketplace**](https://marketplace.visualstudio.com/items?itemName=telosys.telosys-vscode) (Telosys Extension for VSCode)
* on [**Eclipse Marketplace**](https://marketplace.eclipse.org/content/telosys-code-generator-java-javascript-python-nodejs-php-c-javaee-spring-jax-rs-vuejs)
### Help us spread the word about Telosys :loudspeaker:
* follow Telosys page on [**LinkedIn** ](https://www.linkedin.com/company/telosys/)and share the news
* join Telosys group on [**LinkedIn**](https://www.linkedin.com/groups/1340197/) and share your ideas
* follow Telosys on [**Twitter**](https://twitter.com/telosys) and retweet the news
* write something about Telosys on the web (blog, article, etc)
# How to contribute
You can contribute to the project in different ways...
### Create and publish new templates
If you have created templates that can be used by other developers, please post them on GitHub and let us know. They could possibly be added to the Telosys example templates.
### Submit new ideas
If you have ideas for improving Telosys, please let us know. You may have use cases that we haven't thought of, particular target languages, etc. The best ideas are those that come from different projects.
### Write articles or tutorials
You can also share your experience by writing articles or tutorials on your own blog or on sites like LinkedIN ([https://www.linkedin.com/]()), DEV (), HackerNoon (), Medium ( ), etc
### Create new extensions for some IDE or editors
You can create an extension for your favorite IDE or editor in order to get syntax highlighting for Telosys models or templates.
### Contact
Whatever your creation around Telosys let us know.\
Send a mail at :
###
# Sponsors
If you want to become an official sponsor of Telosys, \
send an email to
# IDE and editors
Extensions or plugins have been developed for some editors or IDEs to facilitate editing of Telosys files.
Warning: some are not up to date and do not yet support Telosys 4.0
* **Notepad++**
* See GitHub readme : \
* **Atom**
* See Atom packages : \
\
:information\_source: If you have developed an IDE/editor extension, please let us know.
# Telosys 3 Eclipse plugin
{% hint style="warning" %}
The **Eclipse plugin** only supports **Telosys version 3.3.0**, which is an **old version**.
To take advantage of the latest features, it's best to use the \
most recent version of **Telosys-CLI** with **VS-Code or JetBrains IDE** and the **Telosys extension**.
{% endhint %}
With **Telosys Eclipse plugin** it's very easy to configure a project, create models, design templates and generate your code.
It can be used to generate the code anywhere (not only in Eclipse) so you can use it to generate your code in another IDE workspace.
This plugin is totally free and open source.
See Telosys plugin on **Eclipse marketplace** : \
And see the installation guide : [Eclipse plugin installation](/telosys-with-eclipse/eclipse-plugin-installation)
# Eclipse plugin installation
Telosys plugin can be installed as any other Eclipse plugin by using **Eclipse Marketplace wizard**.
### **1 -** Open Eclipse Marketplace wizard
In the **Eclipse main menu**, select **"Help"** and **"Eclipse Marketplace..."**

Note : if Eclipse cannot connect the Eclipse Market Place web site check the proxy configuration ( in "Window - Preferences", then "General - Network Connections" )
### 2 - Search Telosys plugin in Eclipse Marketplace
In the **"Find"** field enter **"Telosys"** and press Return or click **"Go"**

When the Telosys plugin is found, click on "**Install**"
### 3 - Install Telosys plugin
To install an Eclipse plugin you must accept the terms of its license

Select "*I accept the terms of the license agreement* " and press **"Finish".**
A security warning message is displayed due to the absence of certificate in the plugin.

Ignore the security warning and press **"Install anyway"**.
After installation Eclipse needs to restart

Just restart Eclipse and check the installation.
### 4 - Check the installation
In the menu select "**Help**" - "**About Eclipse**"

You can see the Telosys logo among those of the installed software.
Click on "**Installation Details**"

"**Telosys Code Generator**" must be present in the list of installed software. You can also check its version.
There you go, you can now start using Telosys.
# Eclipse customization
Once Telosys plugin is installed you can customize few Eclipse features in order to be more comfortable.
## Telosys menu visibility
You can customize your Eclipse perspective so that Telosys actions are accessible from the first menu level (instead of going through "Other / Telosys ")
In the main Eclipse menu :
**Window / Perspective / Customize Perspective...**
In "**Menu visibility**" tab : **File / New**

Select the Telosys menu entry :